Nail Dehydrator: What It Does, How It Works, and Why It Matters
Author: Radina Ignatova, Professional Nail Expert & International Nail Educator | Last Updated: April 2026
Quick Answer: A nail dehydrator is a preparation product that temporarily reduces residual moisture within the upper layer of the nail plate before product application. It works at a different level to a cleanser — a cleanser removes surface oils and debris, while a dehydrator addresses moisture within the plate surface itself. The two products are not interchangeable. Skipping the dehydrator and relying on cleansing alone is one of the most consistent causes of premature product lifting across all nail service types.
Quick Summary
The nail plate is not a dry, inert surface. It is a living keratin structure that contains moisture, absorbs humidity from the environment, and carries oils produced by the nail bed and surrounding skin. Even after thorough cleansing, the upper surface layer of the nail retains residual moisture that is not visible to the eye and cannot be removed by wiping alone.
A nail dehydrator works by temporarily displacing this moisture from the surface layer — creating a brief window during which the nail plate surface is drier than its natural state. Product applied within this window bonds to a surface that is significantly more receptive than a surface that has been cleansed but not dehydrated. This is why dehydration is a separate, non-optional step in professional nail plate preparation.
© TheNailWiki
Contents
- What a Nail Dehydrator Is
- How It Works on the Nail Plate
- Why IPA and Acetone Target Different Compounds — and Why You Still Need a Dehydrator
- Dehydrator vs Cleanser — the Key Differences
- When and How to Use a Dehydrator
- The Visual Indicator — What to Look for After Application
- Dehydration and Different Nail Types
- Common Mistakes
- What Clients Should Know
- Frequently Asked Questions
What a Nail Dehydrator Is
A nail dehydrator is a liquid preparation product applied to the nail plate immediately before primer or base coat — after cleansing and as the final preparation step before product application begins. Its function is to temporarily reduce the moisture content within the upper surface layer of the nail plate, creating the most receptive possible surface for product adhesion.
Most nail dehydrators use acetone as their primary active ingredient, often alongside isopropyl alcohol and additional supporting compounds. The acetone component is key — it penetrates slightly into the surface layer of the nail plate rather than simply sitting on top, which allows it to displace moisture that a surface wipe cannot reach. The IPA component assists with surface oil removal. Beyond these two core solvents, professional dehydrator formulations frequently include further ingredients — such as specific surfactants, adhesion-promoting agents, or pH-adjusting compounds — that work alongside the solvents to optimise the nail surface chemistry immediately before product application. These additional ingredients are what differentiate a professional dehydrator from simply applying acetone or IPA directly to the nail — the formulation as a whole produces a more consistent and reliable preparation result than either raw solvent used alone.
Nail dehydrators evaporate rapidly after application — typically within 30 to 60 seconds — which is why product must be applied promptly after the dehydrator has dried. Waiting too long after the dehydrator evaporates allows natural nail moisture to begin returning to the surface layer, reducing the effectiveness of the step.
© TheNailWiki
How It Works on the Nail Plate
The nail plate is composed of multiple layers of compacted keratin cells — onychocytes — that naturally hold a degree of moisture within their structure. The amount of moisture present in the nail plate at any given time is influenced by the client’s natural nail hydration levels, environmental humidity, recent hand washing, hand cream use, and even the time of year. This moisture is not visible and cannot be removed by cleansing — it sits within the plate, not on top of it.
When a dehydrator is applied and allowed to penetrate the surface layer, it temporarily displaces this moisture — drawing it towards the surface where it evaporates along with the dehydrator itself. The result is a nail plate surface that is briefly drier than its natural resting state. This drier state significantly improves the bond between the nail surface and any product applied over it — whether that is a base coat, a nail primer, a builder gel, or a gel polish.
The effect is temporary. The nail plate begins to reabsorb environmental moisture within minutes of the dehydrator evaporating — which is why the preparation sequence must flow continuously from dehydration through to product application without unnecessary pauses. A dehydrated nail left exposed for several minutes before product is applied will partially lose the benefit of the dehydration step.
What dehydration does and does not do
- Does: temporarily reduce moisture within the nail plate surface layer
- Does: create a more receptive surface for product adhesion
- Does: improve bond consistency across all nail service types
- Does not: remove surface oils or debris — that is the cleanser’s role
- Does not: permanently alter the nail plate’s moisture content
- Does not: replace primer in systems that require it
- Does not: remain effective if product is not applied promptly after it evaporates
Why IPA and Acetone Target Different Compounds — and Why You Still Need a Dehydrator
Understanding why IPA and acetone behave differently on the nail plate — and why combining them is more effective than either alone — requires a brief look at what each solvent actually dissolves.
What IPA dissolves
Isopropyl alcohol is a polar solvent — it is particularly effective at dissolving polar compounds, which include water-based residues, lighter surface oils, and water-soluble debris. When IPA is used to cleanse the nail plate, it lifts away the lighter surface oils, sweat residue, and buffing dust that sit on top of the nail plate. It evaporates cleanly and completely, leaving no residue of its own.
However, IPA is less effective at dissolving heavier, non-polar compounds — including certain sebaceous oils and some types of nail plate surface residue that are more resistant to alcohol-based solvents. These compounds remain on the nail plate surface after an IPA wipe, even if the nail appears clean to the eye.
What acetone dissolves
Acetone is a broader-spectrum solvent — it dissolves both polar and non-polar compounds, including the heavier sebaceous oils and surface residues that IPA leaves behind. This makes acetone more effective at removing a wider range of surface contamination from the nail plate. It also penetrates slightly further into the surface layer than IPA, which is why it forms the active ingredient in most nail dehydrators.
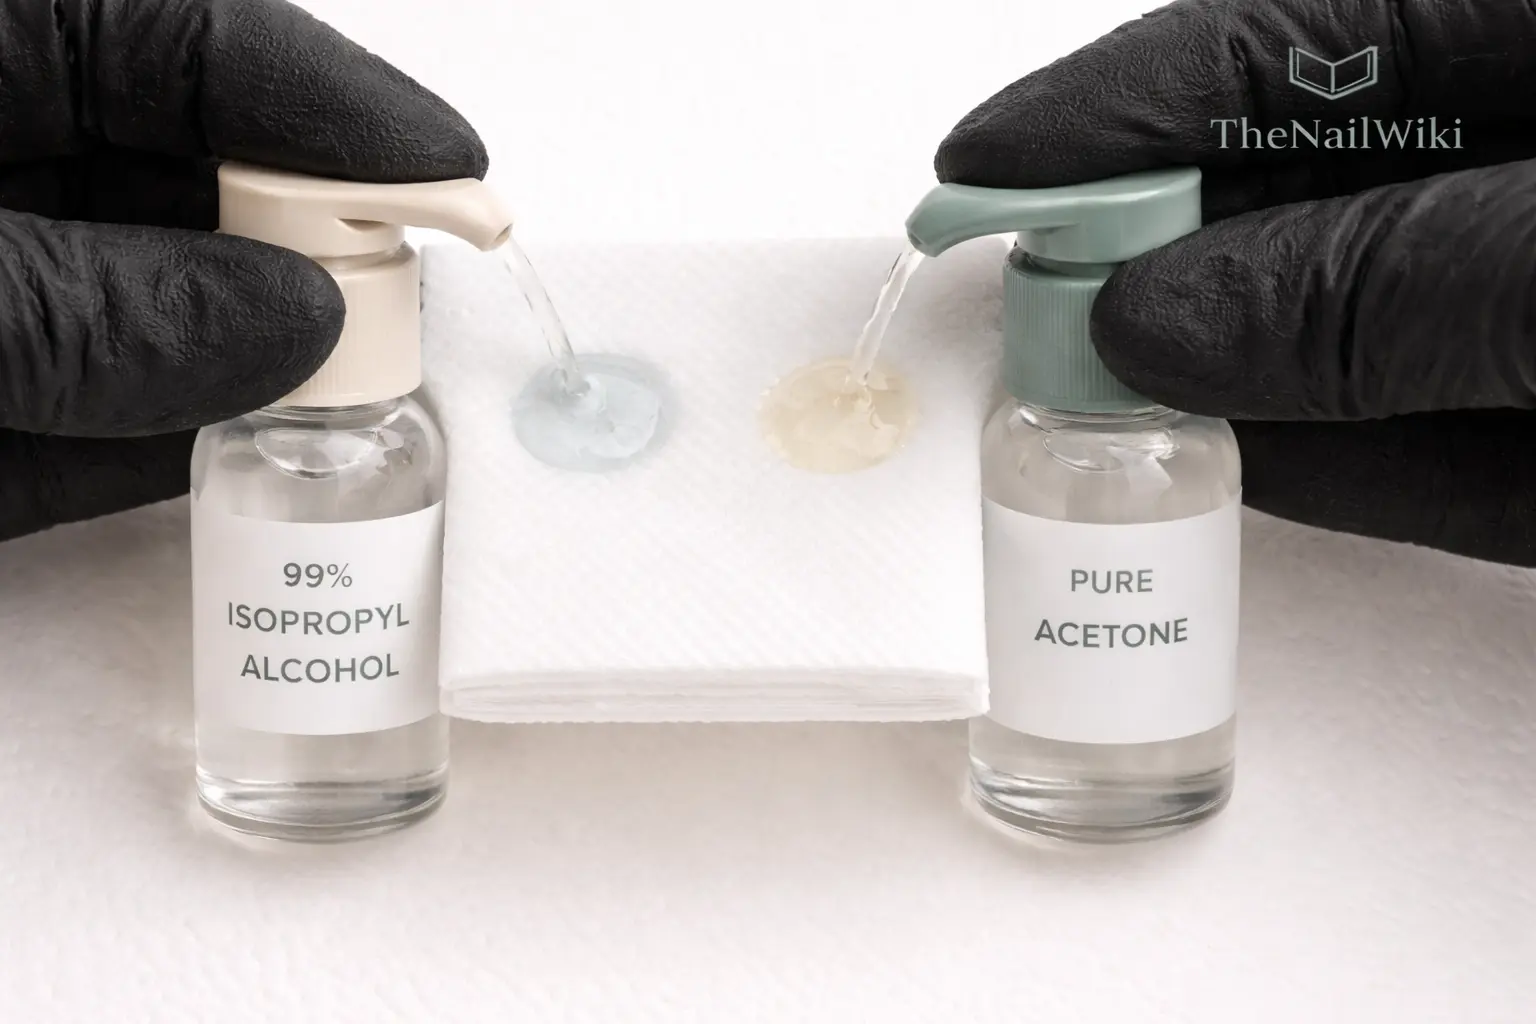
This is the chemical basis for the Radina Double Cleanse Method — one pump of IPA and one pump of acetone on the same lint-free wipe. IPA addresses the water-soluble residues and lighter oils; acetone addresses the heavier, non-polar compounds that IPA cannot fully dissolve. Together they provide a more comprehensive surface clean than either product used alone.
Why cleansing alone is not enough — and what this means for gel shrinkage
A surface that has been cleansed but not dehydrated may look prepared — but the moisture layer within the nail plate surface remains. When gel product is applied over residual surface moisture, it does not bond fully to the nail plate from the moment of application. As the gel cures under the lamp, it can contract slightly away from the areas where adhesion is weakest — most noticeably at the edges. This is one of the contributing factors behind gel shrinkage from edges — a problem that is often attributed to application technique when the actual root cause is incomplete preparation.
The Radina Double Cleanse Method — IPA and acetone combined on the same wipe, followed by a dedicated dehydrator — addresses this at both levels simultaneously. The Radina Double Cleanse Method ensures the most thorough possible surface clean, removing both water-soluble and non-polar residues in a single pass. The dehydrator then eliminates the moisture layer beneath. The result is a nail plate surface that is genuinely adhesion-ready — not just clean in appearance — which is why this preparation sequence consistently produces stronger adhesion, longer wear, and eliminates the shrinkage issue at its source.
© TheNailWiki
Why the Radina Double Cleanse Method does not replace the dehydrator
Even though acetone penetrates the nail plate surface more deeply than IPA, it does not achieve the sustained dehydrating effect of a dedicated nail dehydrator. Here is why:
The Radina Double Cleanse Method is a surface cleaning action — its primary purpose is to remove contamination from on and immediately within the nail plate surface. It is applied on a wipe and removed in the same stroke. A nail dehydrator, by contrast, is applied directly to the nail plate and left to penetrate and evaporate in place — this sustained contact time is what allows it to draw moisture out from within the nail plate layer rather than simply cleaning the surface.
The two steps operate at different depths and serve different purposes. The Radina Double Cleanse Method + dehydrator sequence is the most thorough preparation approach currently used in professional nail services — the Radina Double Cleanse Method maximises surface cleanliness, and the dehydrator then addresses the moisture layer beneath the surface. Neither step covers the function of the other.
Dehydrator vs Cleanser — the Key Differences
The single most important distinction to understand in nail preparation chemistry is that a cleanser and a dehydrator are not the same product, do not achieve the same result, and cannot be substituted for each other. This confusion is the source of more premature product lifting than almost any other preparation error.
The cleanser removes what is on the nail. The dehydrator addresses what is in the nail. These are different locations, different chemistries, and different outcomes. A nail plate that has been cleansed but not dehydrated is cleaner than an unprepared nail — but it is not as adhesion-ready as one that has gone through both steps. For clients with naturally oily nail plates or those who work in humid environments, skipping the dehydrator almost always results in early product lifting.
For a detailed comparison of cleansers and dehydrators side by side, see: Nail Cleansers, Alcohol & Prep Liquids →
When and How to Use a Dehydrator
Position in the preparation sequence
The dehydrator is always the final preparation step before product touches the nail. The correct sequence is: cuticle work → buffing → cleansing (IPA, or the Radina Double Cleanse Method (IPA + acetone)) → dehydrator → primer where required → base coat or first product layer. The dehydrator is never applied before cleansing — it must go onto a clean nail surface, not over oils and debris.
How to apply
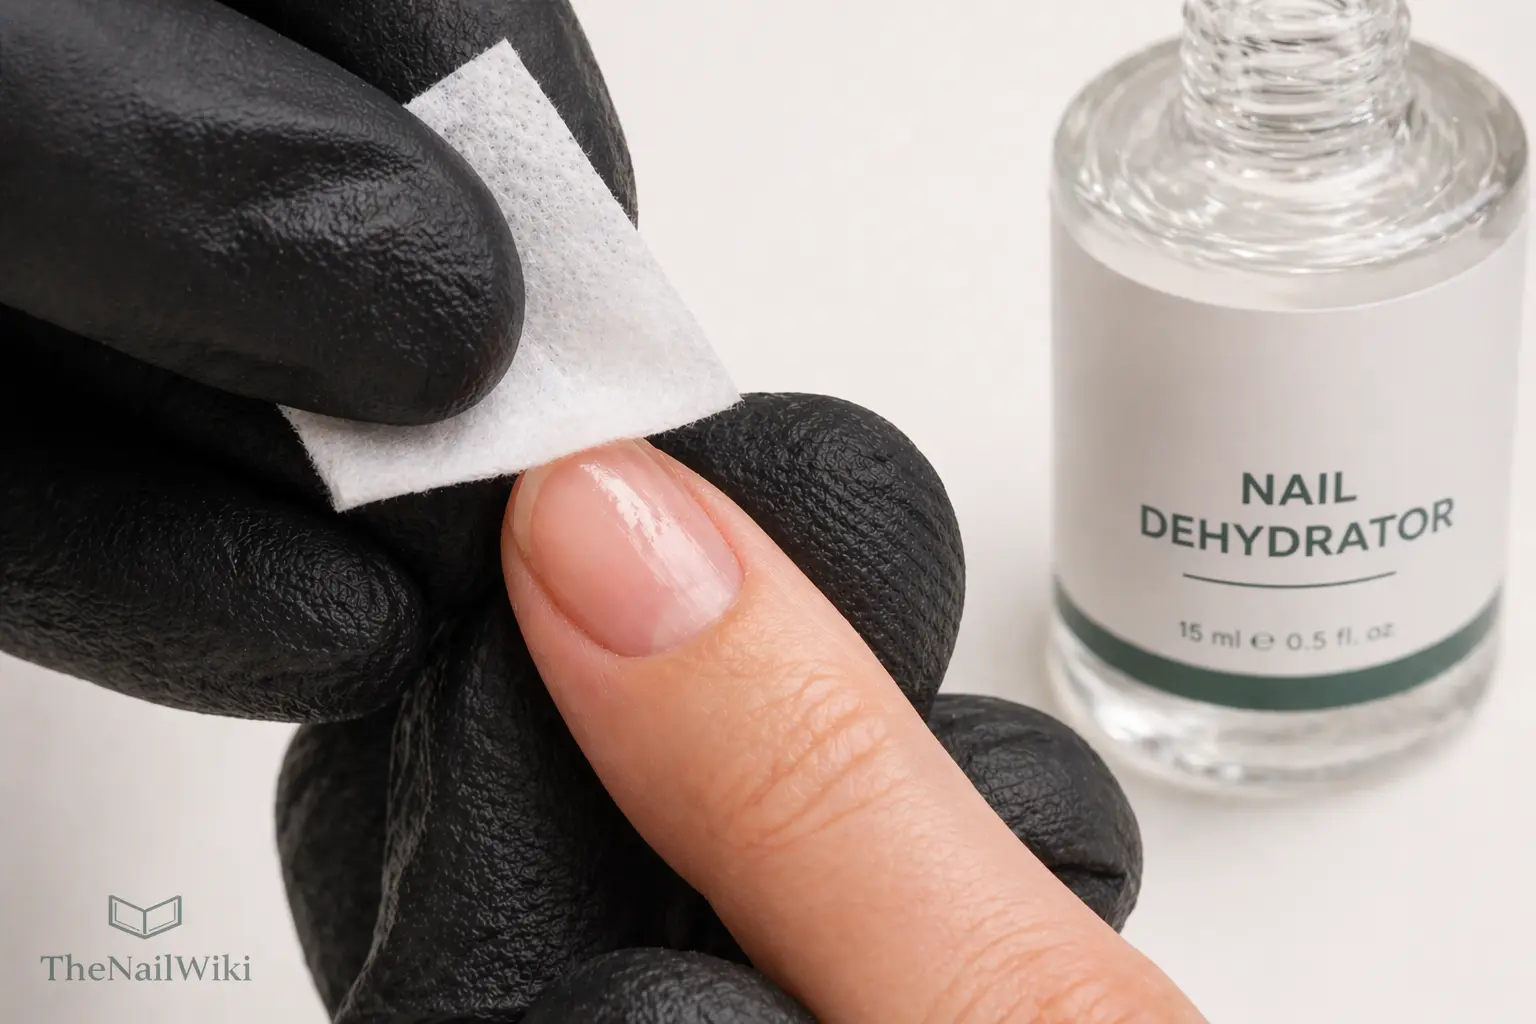
Nail dehydrators are typically applied with a small brush, a dropper nozzle directly onto the nail, or — less commonly — on a lint-free wipe. The application method varies between brands but the principle is consistent: apply a thin, even layer across the entire nail plate surface including the edges, and allow it to evaporate completely before applying product. Do not wipe the dehydrator off — it must be left to evaporate in place so it can perform its moisture-displacing function.
One thin application is sufficient. Applying multiple coats of dehydrator does not produce a better result — the nail plate can only release a certain amount of moisture per application cycle, and additional coats do not compound the effect. Apply once, allow to evaporate fully, then proceed immediately to the next preparation step.
© TheNailWiki
Do not touch the nail after dehydration
As with the cleansing step, the nail plate must not be contacted with bare skin after the dehydrator has been applied. Skin oils transfer instantly and compromise both the cleansing and dehydration steps simultaneously. Once the dehydrator has evaporated, product must be applied without any interim contact with the nail surface.
Full preparation sequence with dehydrator
- Cuticle work — remove dead cuticle from the nail plate surface
- Buffing — de-shine with a 240-grit buffer
- Cleansing — IPA, or the Radina Double Cleanse Method (IPA + acetone) on lint-free wipe
- Dehydrator — apply thin layer, allow to evaporate fully (30–60 seconds)
- Primer — where required by the product system
- Base coat — product application begins
The Visual Indicator — What to Look for After Application
One of the most useful aspects of nail dehydration is that it produces a visible indicator — both on the nail plate itself and on the surrounding skin — that confirms the product has been applied correctly and has reached the surface layer effectively.
On the nail plate
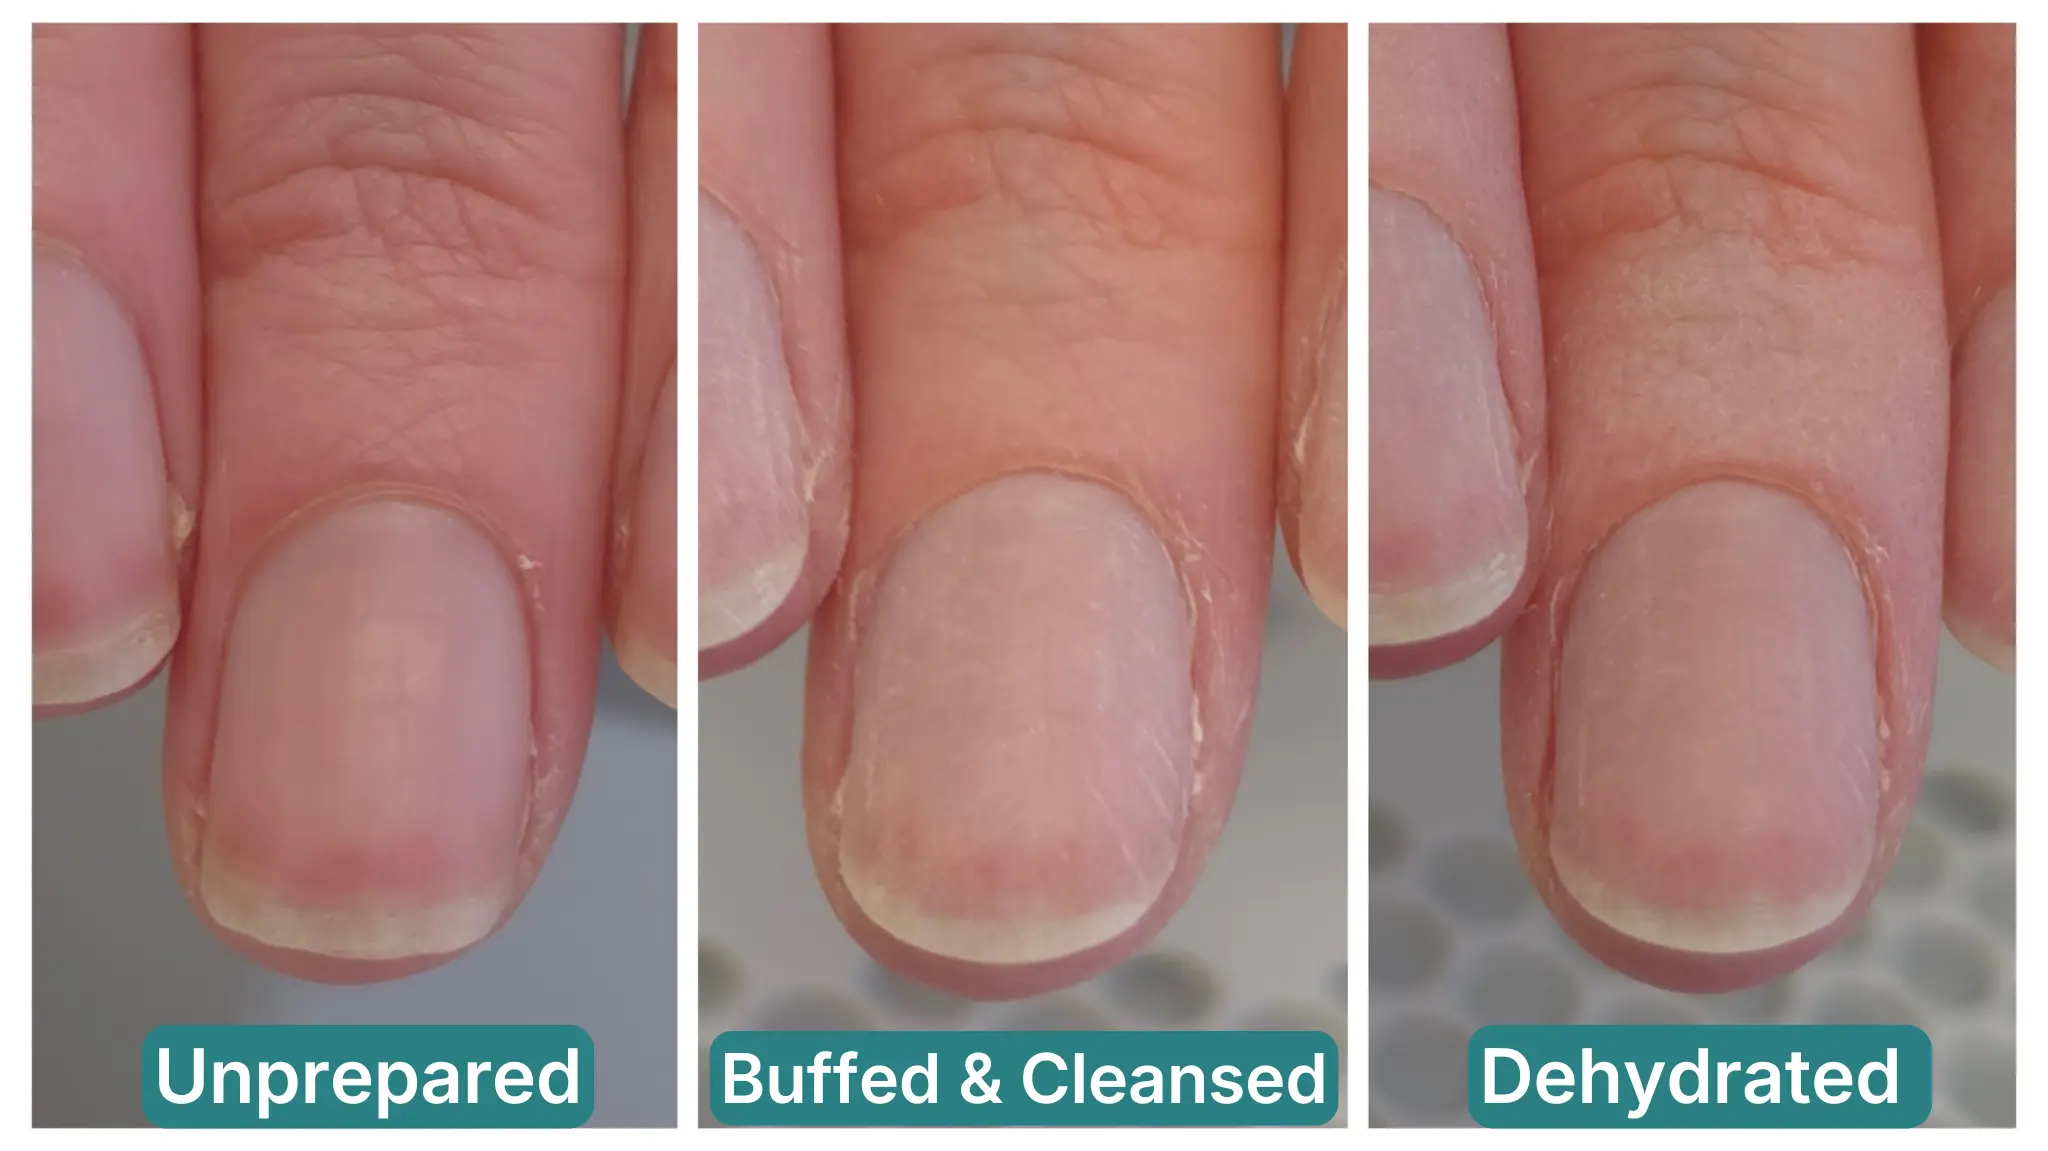
After a dehydrator is applied and begins to evaporate, the nail plate surface takes on a noticeably more matte appearance — slightly chalky or frosted compared to a nail that has only been buffed and cleansed. This is the moisture being drawn towards the surface and evaporating along with the dehydrator. If the nail plate looks much the same after the dehydrator as it did before, the dehydrator may not have been applied thoroughly enough, or the nail may have been contaminated with skin oils between cleansing and dehydration.
On the surrounding skin
The surrounding skin — particularly at the cuticle line and lateral folds — will show a temporary whitening or blanching effect immediately after dehydrator application. This is a normal and expected response to the dehydrating agent contacting the skin surface, and it disappears within a minute or two as the skin’s natural moisture levels recover. This is the most reliable visual confirmation that the dehydrator has been applied close enough to the cuticle edge to have covered the full nail plate surface.
This skin response is clearly visible in the right-hand panel of the three-stage preparation image above — and is one of the reasons that image is such a useful reference for both professionals and clients learning to understand what correct preparation looks like in practice.
Important: The skin dehydration response is temporary and harmless in normal application. If the dehydrator causes any burning sensation, prolonged redness, or skin irritation beyond the brief blanching effect, this may indicate a sensitivity response or that the product is contacting broken skin. If skin irritation occurs, do not proceed with the service and refer to the client consultation records for any noted sensitivities.
Dehydration and Different Nail Types
All nail types benefit from dehydration before product application — but the degree of impact varies depending on the client’s natural nail plate characteristics. Understanding which nail types benefit most from dehydration helps explain why some clients consistently experience better service longevity than others when preparation is correctly adapted to their nail type.
Oily nail plates
Oily nail plates carry higher levels of natural sebum on and within the surface layer. For these clients, the dehydrator is arguably the single most impactful preparation step — without it, product lifting is almost inevitable regardless of how thoroughly the surface has been cleansed. The Radina Double Cleanse Method (IPA + acetone) followed by a dehydrator is the most effective preparation sequence for consistently oily nail types.
Dry or dehydrated nail plates
Dry or dehydrated nail plates still require a dehydrator — even though they may appear to have lower natural moisture levels. The dehydrator addresses the moisture within the surface layer specifically, not the overall hydration of the nail, and this surface moisture is present regardless of whether the nail appears dry overall. However, for very dry nail types, allow the dehydrator to evaporate fully before proceeding — do not rush this step on already fragile nail plates.
Thin nail plates
For clients with thin nail plates, use dehydrator with care — apply a thin, controlled layer and avoid excess product running onto the skin. Thin nail plates can be more reactive to preparation products, and excess dehydrator contacting the surrounding skin for longer than necessary is worth avoiding on sensitive nail types.
Damaged nail plates
Damaged or overfiled nail plates can be more porous than healthy nail plates — meaning the dehydrator may penetrate and evaporate more quickly. Apply the dehydrator as normal but ensure product is applied promptly. Damaged nail plates may also benefit from a bonding base coat rather than a standard base to compensate for reduced structural integrity.
Common Mistakes
Skipping the dehydrator entirely
The most common preparation error. A nail that has been cleansed but not dehydrated looks prepared — but the moisture layer within the surface plate remains. Product bonds to this moisture layer rather than to the nail plate itself, and lifting follows. This is why some technicians experience consistent lifting on certain clients regardless of how thoroughly they cleanse — the missing step is dehydration, not cleansing.
Wiping the dehydrator off
A dehydrator must be left to evaporate in place — not wiped away. Wiping the dehydrator removes it from the nail before it has had time to penetrate the surface layer and displace moisture. The product is applied and the dehydrating action happens during evaporation. Wiping it removes the function entirely.
Applying dehydrator before cleansing
The dehydrator must go onto a clean nail surface — after buffing and cleansing. Applying it before cleansing means the dehydrator is working over surface oils and debris rather than directly on the nail plate, significantly reducing its effectiveness.
Waiting too long before applying product
The dehydrated state is temporary. The nail plate begins reabsorbing environmental moisture within minutes of the dehydrator evaporating. Pausing after dehydration to answer a question, check a phone, or address something else in the salon allows this reabsorption to begin. Product should be applied as soon as the dehydrator has fully evaporated — not several minutes later.
Applying multiple coats expecting a better result
One thin, even application of dehydrator is the correct amount. Multiple coats do not compound the dehydrating effect — the nail plate releases as much moisture as it will release in a single application cycle. Additional coats simply add unnecessary product to the nail surface without improving adhesion.
What Clients Should Know
For clients, dehydration is an invisible step — the product is clear, the application takes only a few seconds, and the result is not immediately visible. This makes it one of the easiest steps for a technician to skip without the client noticing. Understanding what dehydration does — and asking whether it is included in the preparation sequence — is relevant for any client who consistently experiences early lifting or poor service longevity.
Before your appointment
Avoid applying hand cream, cuticle oil, or any oil-based product to the hands in the hours before a nail appointment. These products penetrate the nail plate surface and the surrounding skin, and even thorough cleansing and dehydration may not fully compensate for heavy prior oil use. Clean hands with no product applied is the best starting point for any nail service.
During the service
Once your nails have been cleansed and dehydrated, avoid touching your face, hair, or any surface with your fingertips. Any contact between a prepared nail and skin — yours or anyone else’s — reintroduces oils to the prepared surface and undoes the preparation steps. Both cleansing and dehydration are lost the moment an oily fingerprint contacts the prepared plate.
Frequently Asked Questions
Is a nail dehydrator the same as a nail cleanser?
No — they perform different functions at different depths on the nail plate. A cleanser removes surface oils and debris from the nail plate surface. A dehydrator addresses residual moisture within the surface layer of the nail plate. Both are required — neither replaces the other.
Do I need a dehydrator for gel polish?
Yes — dehydration is beneficial for all gel services, not just enhancements. Gel polish sits in a thinner layer than builder products and relies on a clean, dry, adhesion-ready surface to bond correctly. Clients who experience gel polish lifting within days of application almost always have a preparation issue — and missing dehydration is a frequent contributing factor.
Can I use acetone as a dehydrator?
Pure acetone applied and wiped away on a lint-free wipe performs a surface cleaning function — it does not replicate the sustained dehydrating effect of a dedicated dehydrator product. A dehydrator must be applied and left to evaporate in place to allow it to draw moisture from within the surface layer. Wiping acetone across the nail and removing it immediately does not achieve this.
How do I know when the dehydrator has worked?
Look for two visual indicators: the nail plate takes on a slightly more matte, chalky appearance as the dehydrator evaporates, and the surrounding skin briefly shows a mild whitening or blanching effect at the cuticle line. Both are normal and expected — they confirm the dehydrator has been applied correctly and has reached the surface layer. The skin response disappears within a minute or two.
How long does the dehydrating effect last?
The dehydrated state begins to reverse within minutes of the dehydrator evaporating, as the nail plate reabsorbs environmental moisture. Product should be applied as soon as the dehydrator has fully evaporated — typically within 30 to 60 seconds. Waiting several minutes after dehydration before applying product reduces the effectiveness of the step.
Does the Radina Double Cleanse Method (IPA + acetone) replace the dehydrator?
No — and the two work best used together. The Radina Double Cleanse Method maximises surface cleanliness by combining the different solvent properties of IPA and acetone, removing both water-soluble and non-polar residues in a single pass. The dehydrator then addresses the moisture layer within the nail plate itself. Using both in sequence — Radina Double Cleanse Method followed by dehydrator — produces the strongest possible adhesion and eliminates the surface conditions that contribute to gel shrinkage and early product lifting. Neither step covers the function of the other.
Professional training in nail preparation
Preparation sequencing — including correct dehydrator application, the Radina Double Cleanse Method, primer selection, and preparation adapted to different nail types — is covered in full in the Nail Plate Preparation online course at Artistic Touch Nail Training Academy.
Related Library Pages
Preparation Sequence
- → Nail Plate Preparation — The Full Sequence
- → Nail Cleansers, Alcohol & Prep Liquids
- → Nail Primers — Acid vs Acid-Free
- → Base Coats
- → Nail Buffers Guide
- → Nail Files & Grit Guide
Nail Science
- → The Nail Plate
- → Nail Porosity
- → Nail Hydration & Water Content
- → Nail Adhesion Surface
- → Nail pH
- → Onychocytes (Nail Plate Cells)
Nail Types & Adhesion Issues
- → Oily Nail Plate
- → Dry / Dehydrated Nail Plate
- → Thin Nail Plate
- → Damaged Nail Plate
- → Product Lifting Issues
- → Product Lifting & Adhesion Failure
Some linked pages are currently in development and will be published progressively.
Professional Disclaimer
The information on this page is provided for educational purposes and is intended to support the professional knowledge of nail technicians and nail educators. Nail services should only be performed by trained professionals. Any client with nail conditions, skin sensitivities, or relevant health concerns should be assessed by a qualified professional before any nail service is undertaken.
About the Author
Radina Ignatova
Professional Nail Expert since 2014 | International Nail Educator | Founder of TheNailWiki and Artistic Touch Nail Training Academy
Radina Ignatova is a Professional Nail Expert since 2014 and an International Nail Educator specialising in advanced nail preparation, BIAB, dual form systems, e-file techniques, and professional salon safety. Based in Scotland, UK, she teaches nail technicians internationally through structured online courses.
Her teaching philosophy is centred on honest education — demonstrating real salon challenges, practical corrections, and performance-based technique rather than presenting only polished results.
Read full bio →About TheNailWiki
TheNailWiki is an independent educational platform dedicated to providing accurate, safety-led and professionally informed nail care information to professionals and enthusiasts worldwide. All content is created by qualified nail industry professionals and reviewed for technical accuracy.
For structured professional training, advanced masterclasses, and specialist technique courses, visit Artistic Touch Nail Training Academy.
This library page is published by TheNailWiki — an independent nail education resource maintained by nail industry professionals. Content is safety-led and professionally informed.