Flash Cure Lamps: What They Are, When to Use Them, and What They Cannot Do
Author: Radina Ignatova, Professional Nail Expert & International Nail Educator | Last Updated: April 2026
Quick Answer: A flash cure lamp is a small, handheld curing device that delivers a brief burst of LED light — typically two to five seconds — to partially set the surface of a product layer without fully curing it. Its most common professional use is in dual form and Sandwich Dual Form services — to set the product at the cuticle area so the form stays in place and cures exactly where it has been positioned. A flash cure lamp is never a replacement for a standard nail curing lamp — it sets certain elements in place; it does not complete polymerisation. Every flash-cured layer must be fully cured in a standard lamp before the service is finished.
Quick Summary
A flash cure lamp is a precision tool for specific moments in a nail service where something needs to be held in place before a full cure is applied. The most common use is dual form and Sandwich Dual Form work — setting the product at the cuticle area so the form does not slide or shift, and ensuring the product cures in exactly the position the technician has placed it. It is also used for setting certain nail art elements and decorations in position before encapsulating them.
What a flash cure lamp is not — and this is important — is a substitute for proper curing. A flash cure does not polymerise the product. Free monomers remain throughout the uncured interior and the full cure in a standard lamp is mandatory before the service is complete. What is seen in 30-second social media tutorials presenting flash cure as a complete cure is not correct professional practice and carries real risk of sensitisation.
Contents
What a Flash Cure Lamp Is
A flash cure lamp is a compact, focused LED curing device — typically handheld or pen-shaped — that delivers a short burst of curing light for a matter of seconds. The exposure time is deliberately brief: typically two to five seconds, though depending on the power of the specific lamp and the product being set, slightly longer may be needed to achieve an effective tack. Higher-powered flash cure lamps may set product with less exposure time; lower-powered ones may require a few seconds more. Always test with the specific lamp and product combination in use.
Sensor vs non-sensor lamps
Some flash cure lamps include a motion or proximity sensor — they activate automatically when brought close to the nail surface. Others require a manual button press to activate the light burst. Sensor lamps are convenient for fast, hands-free activation during dual form work where the technician is simultaneously managing the form. Non-sensor lamps give more precise control over exactly when the burst is triggered. Both work effectively — the choice is a practical workflow preference.

© TheNailWiki
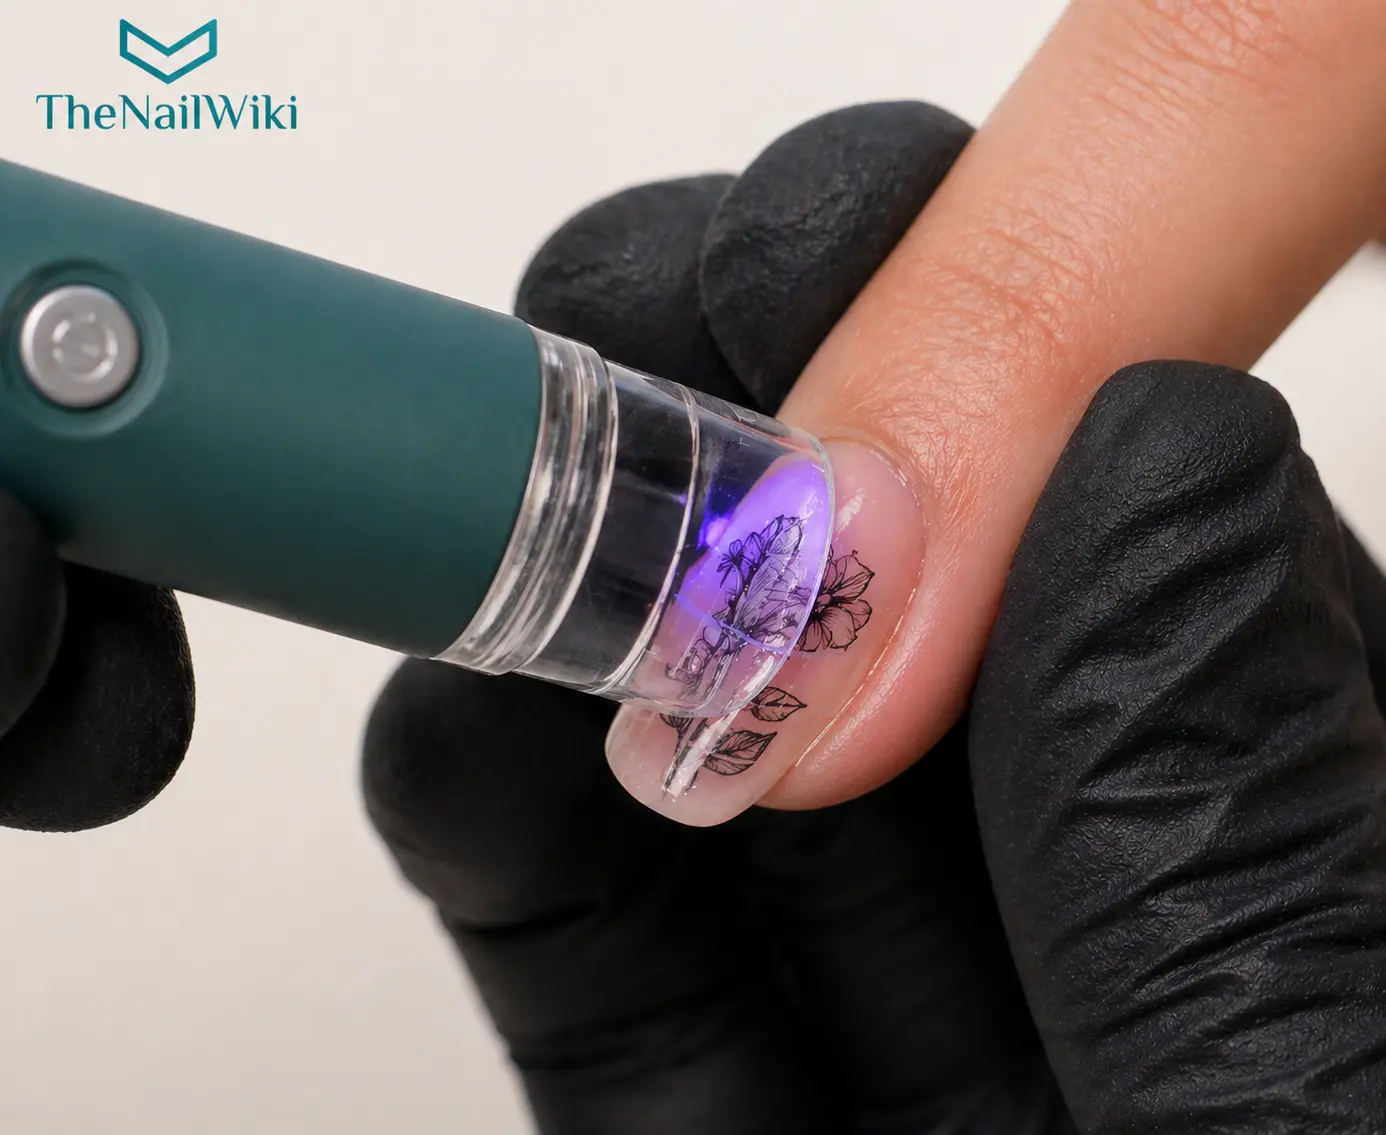
Flash cure lamps with a stamper end
Some flash cure lamps are designed with a nail art stamper at the opposite end of the device. This dual-purpose tool allows the technician to stamp a design onto the nail and then immediately flash-cure it in place using the same tool — without switching between instruments. This is a useful format for stamping work, nail decals, and stamping nail art — the flash cure sets the stamped element in position before further product is applied over it. As with all flash cure use, this does not replace the full cure step at the end of the service.
© TheNailWiki
How a Flash Cure Works
When a gel product is exposed to light for a fraction of its full curing time, the photoinitiators within it begin reacting but the polymerisation process does not complete throughout the full depth of the product layer. The surface — where light intensity is highest — begins to set and firm up. The deeper layers, which receive less light in the brief exposure, remain softer and more workable.
This creates a product state that is sometimes described as “tacked” — the surface has enough firmness to hold its position and resist flowing or spreading, while the interior remains malleable enough to be shaped, blended, or refined with a brush or sculpting tool before the product is fully cured in a standard lamp.
It is important to understand that a flash-cured product is not partially safe to leave on the nail. The interior layers still contain free monomers — unreacted chemical units that carry sensitisation risk. A flash-cured product must always be followed by a full cure in a standard nail lamp before the service is considered complete. Flash curing is a working technique, not a finishing step.
Flash Cure Lamp vs Standard Nail Lamp
When Flash Cure Is Used
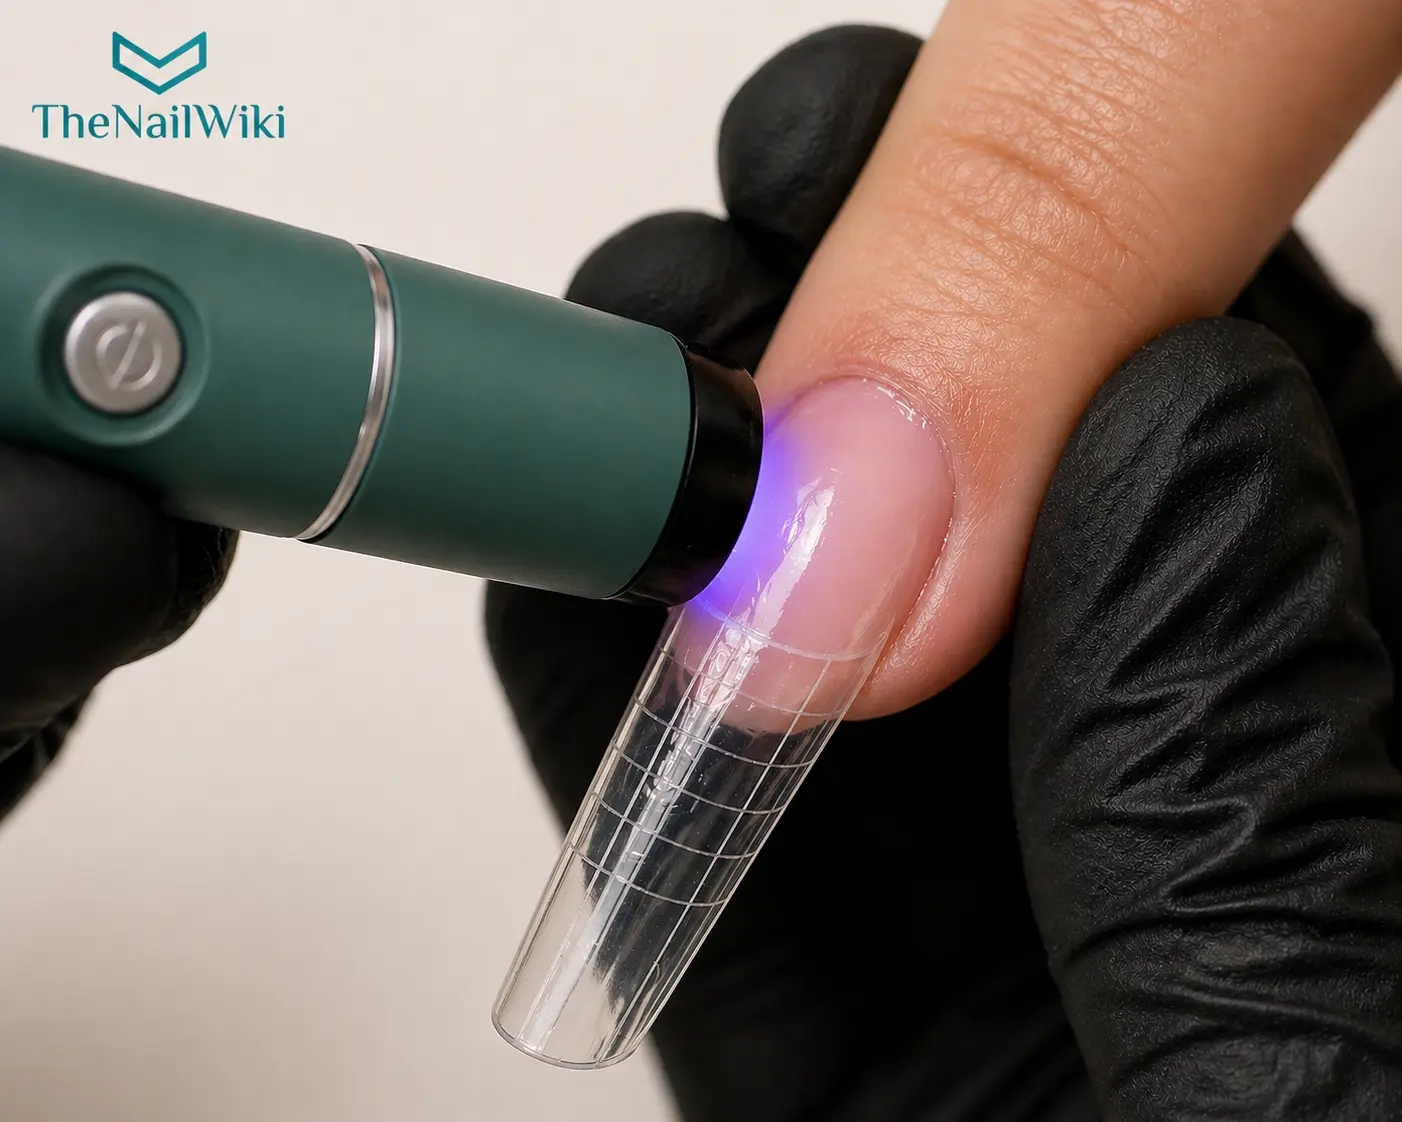
Dual forms and Sandwich Dual Forms — the most common use
The most frequent professional use of a flash cure lamp is in dual form and Sandwich Dual Form services. When a dual form is pressed over the product and positioned on the nail, the product must be set at the cuticle area to prevent the form from sliding off or shifting before it is placed under the standard lamp for a full cure. A flash cure at the cuticle zone holds the form in place and ensures the product cures in exactly the position the technician has placed it — not the position it has drifted to.
This is the primary practical application of flash curing in modern nail services. Without it, managing multiple dual forms simultaneously — keeping each form positioned correctly while moving to the next nail — would not be practical.
© TheNailWiki
Nail art elements and decorations
Flash curing is also used to set certain nail art elements in position before the encapsulating or sealing layer is applied over them. This includes 3D nail art elements, rhinestones and crystals placed into gel before it is sealed, and stamped designs or decals that need to be tacked before the top coat or encapsulating gel is applied. A flash cure holds these elements precisely where they have been placed.
Encapsulation work
In encapsulation nail art — where elements such as dried flowers or glitter are embedded within a gel layer — a flash cure after placing the element holds it in position while the encapsulating gel layer is applied over the top, preventing the element from moving during the next application step.
How to Use a Flash Cure Lamp Correctly
Position directly over the area being set
A flash cure lamp must be held directly over the specific area of product being tacked — for dual form work this is typically the cuticle area where the form meets the nail plate. The concentrated beam of a flash cure lamp is designed for single-nail, single-zone use. Attempting to flash-cure multiple nails simultaneously by sweeping the lamp will not achieve an effective tack on any nail.
Exposure time depends on the lamp
Two to five seconds is a general guide — but the correct exposure time depends on the power output of the specific lamp and the product being set. A more powerful flash cure lamp may achieve an effective tack in two seconds. A lower-powered one may need four or five, or slightly more for certain products. If the product has not set after the initial flash, apply a slightly longer burst rather than repeating multiple short flashes. Test the lamp with your specific products to understand its effective exposure time before using it on a client.
Always follow with a full cure
Every flash-cured layer must be fully cured in a standard nail curing lamp before the service is finished. A flash cure leaves the interior of the product uncured — the free monomers present are a sensitisation risk and the product is structurally incomplete. Full cure is non-negotiable at the end of every service.
⚠️ A flash cure is never a substitute for a full cure
Flash curing sets certain elements in place. It does not complete polymerisation. Every flash-cured service must end with a complete full cure in a standard nail lamp — without exception. A service left with only flash-cured product is incomplete and carries real risk of sensitisation.
Flash Cure and Heat Spike
Heat spike — the brief burning sensation caused by the exothermic polymerisation reaction — can occur during flash curing, particularly when the lamp is held very close to the nail surface or the product layer is thick. The concentrated, high-intensity beam of a flash cure lamp can trigger a fast, localised reaction in the surface layer of the product, releasing heat rapidly in the zone directly beneath the lamp.
If a client reports heat during flash curing, increase the distance between the lamp and the nail surface slightly — the flash cure will take a fraction longer but the heat spike will be reduced. Alternatively, reduce the product layer thickness in that zone before flash curing. The same principle applies as with standard curing: thinner layers produce less exothermic heat because there is less product reacting simultaneously.
Clients with thin nail plates are more susceptible to heat sensitivity during all curing steps including flash cure. Take extra care with lamp positioning and product thickness on these clients.
What Flash Cure Is Not Used For
⚠️ What you see on social media is not proper professional practice
Thirty-second nail tutorials on social media frequently show flash cure lamps being used as if they are a complete cure — the product is flash-cured and the service moves on with no standard lamp cure following. This is presented for aesthetic purposes and for the pace and format of short-form video content. It is not correct professional education and it is dangerous.
A flash cure does not complete polymerisation. Product left in a partially cured state — with free monomers unreacted throughout its interior — is a direct route to contact sensitisation and nail allergies. Sensitisation is permanent — once it occurs, the client may react to that chemical family in any product for the rest of their life. Do not replicate what you see in social media short-form content without understanding what has been omitted from the edit.
As a replacement for a full cure
A flash cure lamp must never be the final curing step for any product layer. It does not deliver complete polymerisation. A standard full-hand nail lamp is mandatory for all final curing. Every layer that has been flash-cured must be fully cured before the service ends and the client leaves.
Gel polish services
Flash curing is not used in standard gel polish services. Each gel polish layer is fully cured in a standard lamp before the next is applied. Flash curing gel polish layers between coats leaves them partially uncured.
Basic BIAB application
Standard BIAB application over natural nails does not require flash curing in most circumstances. Each layer is fully cured in a standard lamp. Flash cure may be used by more experienced practitioners in specific structural applications but it is not part of basic BIAB protocol.
Frequently Asked Questions
Is a flash cure lamp the same as a standard nail lamp?
No. A standard nail lamp delivers a full cure — complete polymerisation throughout the product layer. A flash cure lamp delivers a brief partial surface set, leaving the interior of the product uncured and workable. A flash cure lamp cannot replace a standard nail lamp — full curing must always be completed in a standard lamp at the end of every service stage.
Can I use a flash cure lamp for gel polish?
No — flash curing is not appropriate for gel polish services. Gel polish layers are thin and applied in controlled, flow-controlled applications. Each layer should be fully cured in a standard nail lamp before the next is applied. Flash curing gel polish layers would leave them partially uncured.
How long should a flash cure take?
Typically two to five seconds — just long enough to tack the surface and prevent the product from flowing or shifting while the technician continues working. Extending beyond this begins to cure deeper layers unnecessarily, reducing the workability of those layers.
Is flash-cured product safe to leave on the nail?
No — flash-cured product still contains free monomers throughout the uncured interior layers. These are a sensitisation risk and the product is structurally incomplete. Every flash-cured layer must be followed by a full cure in a standard nail lamp before the service is finished.
Do I need a flash cure lamp for dual forms?
Not always — it depends on the specific dual form technique being used and the product. Some technicians use a flash cure before pressing the upper form to hold product placement. Others work directly with the form without flash curing. Follow the guidance of your product system and adapt based on your experience with the specific products and form types in use.
What is the difference between flash cure and a standard LED cure?
The difference is exposure time and the depth of curing achieved. A standard LED cure (30–60 seconds) provides sufficient exposure to fully polymerise the product throughout its entire layer depth. A flash cure (2–5 seconds) only initiates and partially completes the surface polymerisation — the interior remains uncured. Both use the same LED technology and wavelengths — the distinction is entirely in the duration of exposure.
Professional training in nail enhancements
Flash cure technique, structured enhancement work, dual form systems, and advanced builder gel application are covered as part of the training courses at Artistic Touch Nail Training Academy.
Related Library Pages
Lamps & Curing
Enhancement Systems
Techniques
Safety
Some linked pages are currently in development and will be published progressively.
Professional Disclaimer
The information on this page is provided for educational purposes and is intended to support the professional knowledge of nail technicians and nail educators. Nail services should only be performed by trained professionals.
About the Author
Radina Ignatova
Professional Nail Expert since 2014 | International Nail Educator | Founder of TheNailWiki and Artistic Touch Nail Training Academy
Radina Ignatova is a Professional Nail Expert since 2014 and an International Nail Educator specialising in advanced nail preparation, BIAB, dual form systems, e-file techniques, and professional salon safety. Based in Scotland, UK, she teaches nail technicians internationally through structured online courses.
Read full bio →About TheNailWiki
TheNailWiki is an independent educational platform dedicated to providing accurate, safety-led and professionally informed nail care information to professionals and enthusiasts worldwide.
For structured professional training visit Artistic Touch Nail Training Academy.
This library page is published by TheNailWiki — an independent nail education resource. Content is safety-led and professionally informed.