Nail Buffers Guide: Types, Uses, and Buffing Technique
Author: Radina Ignatova, Professional Nail Expert & International Nail Educator | Last Updated: April 2026
Quick Answer: A nail buffer is an abrasive tool used to smooth, refine, and polish the nail surface — distinct from a nail file, which is used to shape and reduce. Buffers are typically fine-grit and work in a sequence from coarser smoothing through to high-shine polishing. Used correctly, buffing improves nail surface texture, removes ridges, and prepares the nail plate for product application. Used incorrectly or too frequently, it thins the nail plate and causes lasting damage.
Quick Summary
Nail buffers serve a different purpose from nail files. Where a file removes material and shapes the nail, a buffer refines the surface — smoothing imperfections, removing ridges, and bringing the nail to a polished finish. Most buffers work in a sequence: a slightly coarser side smooths the surface first, and progressively finer sides refine and polish.
In a professional context, buffing has two distinct applications: preparing the nail plate before product application by de-shining the surface, and finishing the nail after product application or removal to achieve a smooth, polished result. Each application requires a different approach, a different grit, and a different level of pressure.
Contents
Nail File vs Nail Buffer — What Is the Difference?
The terms nail file and nail buffer are sometimes used interchangeably, particularly in home nail care — but they refer to tools with different functions, different grit ranges, and different applications. Understanding the distinction prevents misuse that can damage the nail plate.
A nail file removes material. It shapes the free edge, reduces the length of enhancements, or abrades the nail plate surface to create a receptive base for product. Files are available across a wide grit range — from very coarse (80 grit for removing bulk enhancement product) through to fine (240 grit for de-shining the natural nail plate). Read more: Nail Files & Grit Guide →
A nail buffer refines and polishes the surface. It does not significantly shape or reduce the nail — it smooths existing texture, removes minor ridges, and brings the surface to a polished finish. Buffers operate in the fine to ultra-fine grit range and are used after filing, after product removal, or as a finishing step.
The distinction in practice
- File: shapes, reduces, abrades — used before buffing
- Buffer: smooths, refines, polishes — used after filing
- A buffer should never be used in place of a file for shaping
- A file should never be used in place of a buffer for polishing — it will scratch, not shine
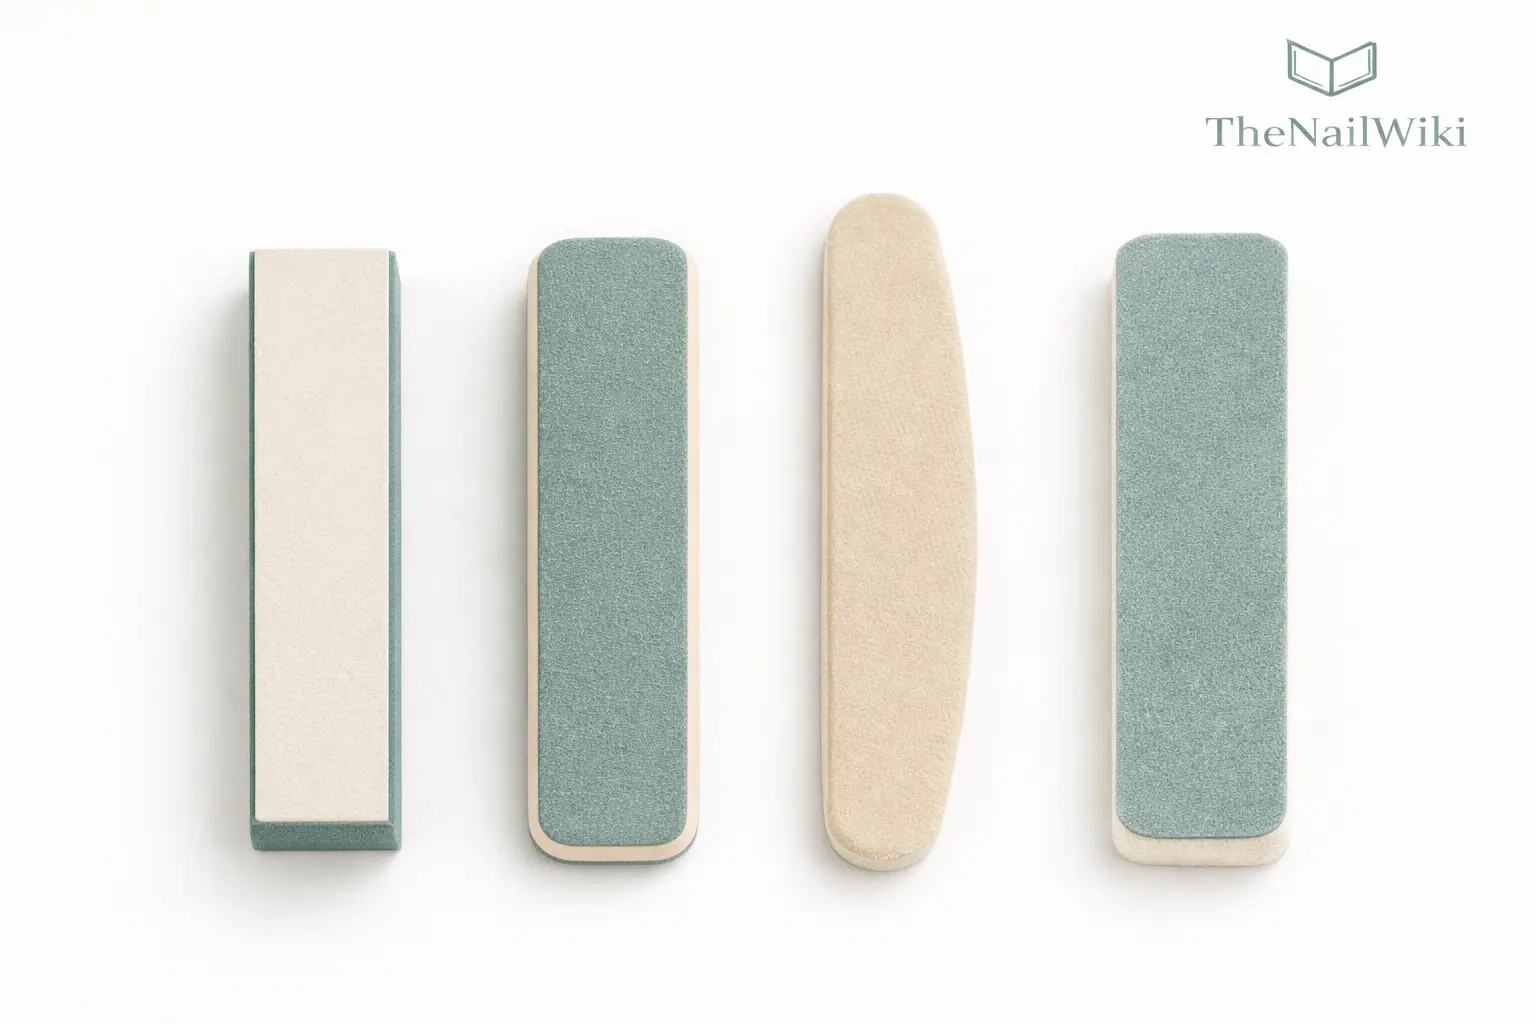
Buffer Types
Nail buffers are available in several formats, each suited to a specific application or setting. The format determines how the buffer is held, how pressure is applied, and how precisely it can reach different areas of the nail surface.
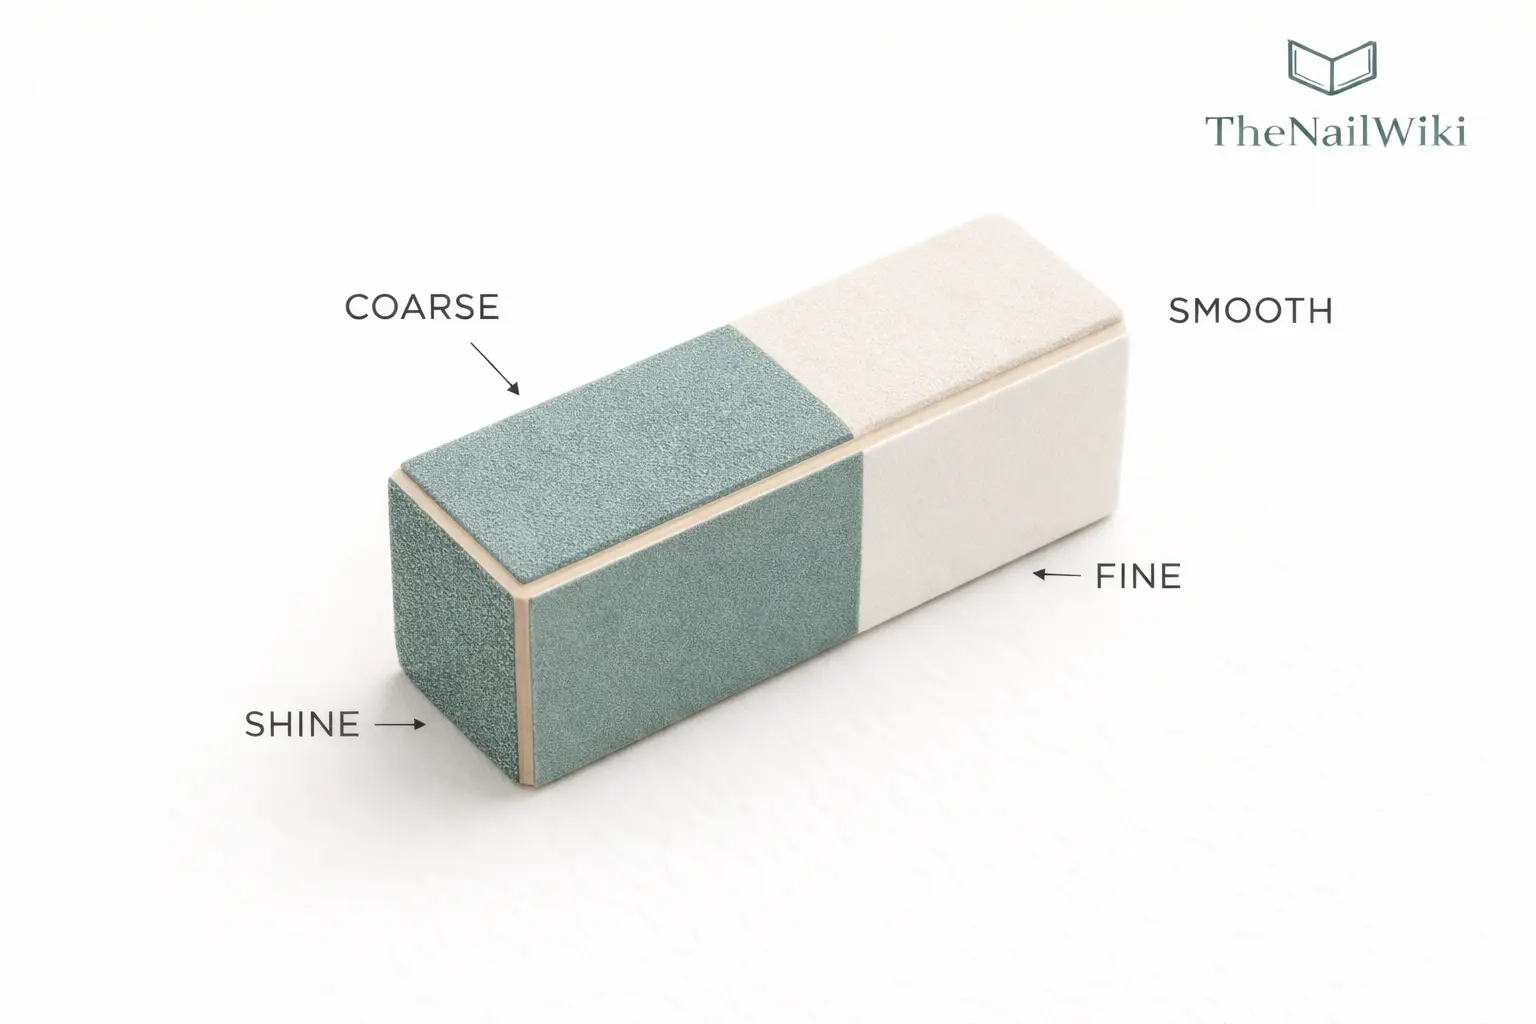
Block buffer (four-sided block)
The most widely recognised buffer format — a rectangular block with four distinct sides, each a different grit or finish. The sides are used in sequence, typically from the coarsest (smoothing) through progressively finer sides to a final polishing surface. Block buffers are compact, easy to hold, and available in both professional and home versions.
The grit sequence varies between brands, but a typical four-sided block progresses through: smoothing (around 180–240), refining (around 320), polishing (around 400–600), and shine (800+). Not all block buffers include all four stages — some combine stages or focus on the finishing end of the range.
© TheNailWiki
Cushion buffer
A flat buffer with a foam core — similar in construction to a cushion nail file but in a finer grit range suited to buffing rather than shaping. The foam core gives the buffer a degree of flexibility that allows it to conform to the curved surface of the nail plate, making it more effective than a rigid flat surface for achieving even contact across the whole nail. Cushion buffers are a staple of professional nail finishing.
Shine buffer (chamois / leather buffer)
A very fine or non-abrasive buffer used specifically to produce a high-shine finish on the natural nail plate. Chamois and leather buffers work through friction rather than abrasion — the buffing action warms the nail surface slightly and produces a natural shine without removing any significant nail plate material. They are used at the very end of the buffing sequence after all smoothing and refining steps are complete.
Sponge buffer
A soft sponge-backed buffer with a fine abrasive surface. The sponge backing provides more flexibility than a foam core and is particularly suited to buffing curved enhancement surfaces or areas where a rigid buffer would create flat spots. Sponge buffers are commonly used for smoothing gel or builder gel surfaces after curing.
Buffer types at a glance
- Block buffer: multi-stage, most versatile, professional and home use
- Cushion buffer: flexible, even contact, professional standard for preparation buffing
- Shine buffer (chamois): friction-based shine, final step only, natural nails
- Sponge buffer: flexible, suited to curved enhancement surfaces
© TheNailWiki
Grit Ranges for Buffers
Buffers operate in the fine to ultra-fine end of the grit range — significantly higher grit numbers than the files used for shaping and de-shining. The grit system is the same as for files: higher number equals finer abrasive. For a full explanation of grit, see: Nail Files & Grit Guide →
The 240-grit buffer for nail preparation: A 240-grit cushion buffer is the correct tool for de-shining the natural nail plate before product application. This is the preparation buffing step — its purpose is to remove the surface gloss from the nail, not to smooth or polish it. This step is used as part of nail plate preparation before any coating is applied, and should always be done in one direction only.
What Buffing Achieves — and What It Does Not
Buffing is a useful and legitimate part of nail care, but it is frequently misunderstood — both in terms of what it can achieve and in terms of its limitations and risks. Understanding both sides prevents over-buffing, which is one of the most common causes of nail thinning in both professional and home settings.
What buffing can achieve
- Removes surface ridges — longitudinal ridges on the nail plate surface are smoothed by the abrasive action of a buffer, creating a more even texture
- De-shines the nail plate — removes the natural gloss from the nail surface before product application to improve adhesion
- Creates a polished finish — a high-grit buffer or shine buffer produces a natural shine on the nail plate without any product
- Smooths enhancement surfaces — after gel or builder gel cures, a buffer smooths any surface imperfections before top coat or further product application
- Improves the appearance of nail texture — for clients with uneven or rough nail surfaces, regular gentle buffing can noticeably improve appearance
What buffing cannot achieve
- Cannot strengthen a thin nail — buffing removes nail plate material. A thin nail that is buffed becomes thinner. Buffing does not add strength
- Cannot fix deep grooves or pitting — nail pitting and deep structural grooves originate within the nail matrix and cannot be buffed away without removing an unsafe amount of plate material
- Cannot treat nail conditions — buffing over onycholysis, discolouration caused by green nail syndrome, or any active nail condition will not improve the condition and may worsen it
- Cannot replace correct preparation — buffing the nail plate does not remove dead cuticle, surface oils, or moisture. These require separate preparation steps
⚠️ Over-buffing is a real and common problem
Every time the nail plate is buffed, a small amount of nail material is removed. The natural nail plate is not thick — repeated buffing, particularly with too coarse a grit or too much pressure, thins it significantly over time. A thinned nail plate is more flexible, more prone to breaking, more sensitive during lamp curing, and less able to support coatings and enhancements. For clients who buff their nails regularly at home, the cumulative effect is often responsible for nails that appear weak and fragile despite regular nail care.
Correct Buffing Technique
How a buffer is used is as important as which buffer is chosen. Incorrect buffing technique causes damage regardless of the grit — and the damage accumulates with each service or home use session. These principles apply whether buffing is being done as part of professional nail preparation or as home maintenance.
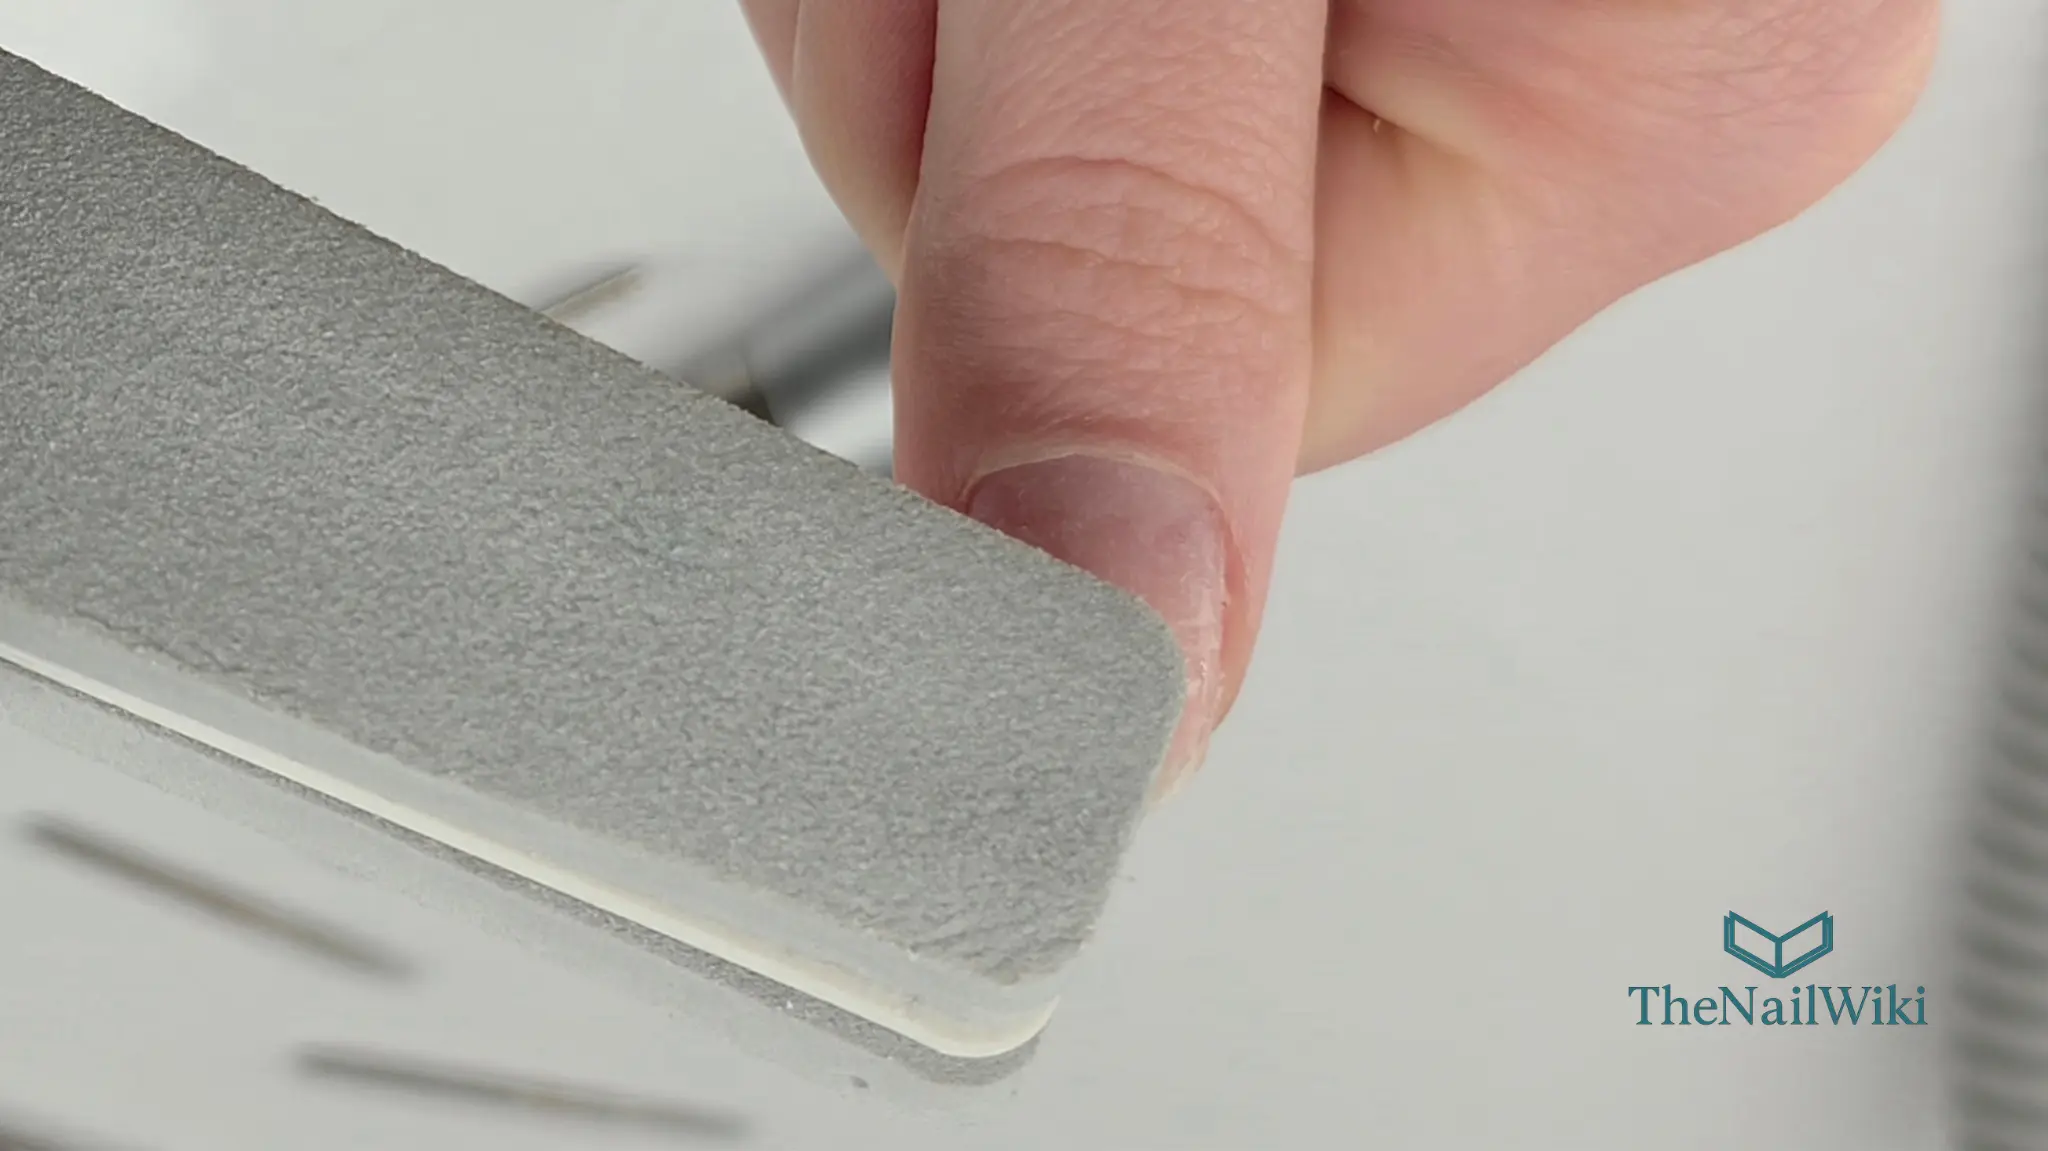
Always buff in one direction
Buffing must always be done in one direction — a single controlled stroke across the nail surface, repeated as needed. Moving the buffer back and forth in a scrubbing motion generates heat through friction, disrupts the nail plate surface unevenly, and removes significantly more material than a directional stroke. The result is an overworked, heat-stressed nail surface rather than a smooth one.
When de-shining the nail plate for preparation, buff across the plate from one side to the other in a single stroke. When smoothing a ridge, buff along the length of the ridge in one direction. When using a block buffer for polishing, work across the nail in one direction at each stage before moving to the next side.
© TheNailWiki
Use light, even pressure
A buffer does not need to be pressed hard against the nail to work. Light, consistent pressure allows the abrasive surface to do its job without generating excess heat or removing more material than needed. Pressing harder does not produce a better result — it simply removes more nail plate and increases the risk of heat damage.
If the buffer is not producing the desired result with light pressure, check whether the grit is appropriate for the task — the answer is usually a slightly coarser stage, not more pressure with the current one.
Work through the sequence
When using a multi-stage buffer — such as a four-sided block — work through each stage in order. Skipping stages does not save time; it simply means the finer stages have to work harder to achieve what the coarser stage should have done first. Each stage removes the scratch marks left by the previous one. Skipping a stage leaves deeper scratches on the nail surface that the next stage cannot fully address.
For de-shining before product application, only the first stage (240 grit) is needed — the goal is to remove the surface gloss, not to polish. Do not work through all stages of a block buffer before applying gel or coating product — the polishing stages create too smooth a surface for product adhesion.
Limit the number of passes
The number of strokes needed to achieve the desired result should be minimal. For de-shining before product application, a single light pass across the nail plate is often sufficient. For polishing a natural nail, a few passes at each stage are typical. If many passes are needed to achieve the result, the grit or the buffer type may not be appropriate for the task — not the solution.
Buffing technique — key rules
- Always buff in one direction — never back and forth
- Use light, even pressure — the buffer does the work
- Work through the sequence in order — do not skip stages
- For preparation de-shining: first stage only (240 grit), one direction, one or two passes
- For polishing: work through all stages in sequence, finishing with the shine stage
- Stop when the goal is achieved — more passes do not improve the result
Buffing by Purpose
Before product application — de-shining the nail plate
The purpose of buffing before product application is to remove the surface gloss from the nail plate — creating a slightly textured surface that gel or enhancement products can key into. A 240-grit cushion buffer is the correct tool for this step. One or two light passes in one direction across the plate surface is sufficient. Do not over-buff, and do not work through polishing stages — a polished nail surface is too smooth for reliable product adhesion. This step is part of the broader nail plate preparation process.
After gel or builder gel — smoothing the cured surface
After a gel or builder gel product has cured, the surface may have minor imperfections — slight texture variations, small peaks, or areas where the gel has not levelled perfectly. A sponge buffer or fine-grit cushion buffer smooths these imperfections before a top coat or further product is applied. This is a surface refinement step — not a reshaping step. If significant reshaping is needed, a file is required first.
After product removal — restoring natural nail surface
After gel polish or enhancement removal, the natural nail plate surface may appear uneven — with minor ridges or texture variations from the previous coating. A gentle buff with a 240–320-grit buffer smooths the surface and restores a more even appearance. This step should be very light — the nail plate is often temporarily more sensitive after product removal, and over-buffing at this stage causes unnecessary thinning.
Natural nail polishing — achieving a shine without product
A natural nail polish finish — using a block buffer or shine buffer through all stages — produces a glossy surface without any gel or lacquer. This is a popular option for clients who prefer a clean, product-free look. The polishing sequence should be followed in order, finishing with the highest grit stage. This should not be done at every appointment — monthly is a reasonable maximum for most nail types, and less often for clients with thinner nails.
Professional training in nail preparation and finishing
Buffing technique, preparation sequencing, and finishing protocols for all nail services are covered as part of the Nail Plate Preparation online course at Artistic Touch Nail Training Academy.
When Not to Buff
Buffing is not always the appropriate response to a nail surface issue. There are situations where buffing should be avoided entirely — either because it will not help or because it will actively worsen the problem.
Already thin or damaged nails
If the nail plate is already thin, flexible, or showing signs of structural weakness, buffing removes more of what is already insufficient. Damaged nail plates need protection and support — not further abrasion. A builder product or strengthening treatment is more appropriate than buffing.
Active nail conditions
Nails affected by onycholysis, green nail syndrome, fungal infection, or any active condition should not be buffed. Buffing over a compromised nail plate can spread infection, worsen the existing condition, or generate dust that contaminates the surrounding workspace and tools.
Immediately before applying product — after polishing stages
If a nail has been buffed to a high shine using polishing stages, it should not have gel or enhancement product applied directly over it — the polished surface is too smooth for reliable adhesion. If a nail has been accidentally over-polished before product application, a light pass with a 240-grit buffer is needed to re-create a receptive surface before proceeding.
Too frequently — at every appointment without assessment
Buffing the natural nail plate at every appointment — even lightly — removes a small amount of material each time. Over weeks and months this accumulates. The decision to buff should be based on whether the nail surface needs it, not on routine habit. If the surface does not require smoothing or de-shining, it should not be buffed.
Buffer Hygiene and Replacement
Buffer hygiene follows the same principles as file hygiene. Buffers used in a professional setting accumulate nail dust, debris, and skin cells during use and must be handled with appropriate protocols.
Single-use buffers in professional settings
Foam-core cushion buffers and block buffers cannot be fully sterilised — the foam or paper core traps debris that cannot be removed by surface cleaning. In a professional setting, these buffers should be used on a single client and either disposed of or given to the client for their own continued use. They should never be shared between clients.
Reusable buffers
Chamois and leather shine buffers can be washed and dried between uses. They do not have a porous core that traps debris in the same way as foam buffers, and surface cleaning is more effective. Follow the manufacturer’s guidance for the specific buffer material.
When to replace a buffer
Replace a buffer when it no longer performs at its intended stage — when the smoothing side no longer smooths, or the polishing side no longer polishes. Worn buffers require more passes and more pressure to achieve the same result, which increases the risk of over-working the nail surface. In professional use, replace buffers regularly as part of standard hygiene practice.
Buffers used on nails with active conditions — including onycholysis or green nail syndrome — must be disposed of immediately after use and must never be returned to the general buffer stock, even for the same client at a future appointment.
What Clients Should Know
Nail buffing is one of the most common home nail care habits — and one of the most frequently done incorrectly. Understanding what a buffer does and how often it should be used prevents one of the most common causes of progressively thinning, weakening nails in clients who believe they are maintaining their nails carefully.
How often is safe to buff at home
For most clients, buffing to a shine finish at home once a month — or less — is reasonable. More frequent buffing accumulates plate thinning that becomes apparent over months. Clients with already thin or brittle nails should avoid buffing the plate surface and focus on nourishing and protecting the nail rather than abrading it further.
Buffing with gel or enhancements
Clients who regularly wear gel polish or enhancements should not be buffing their nail plates at home between appointments. The nail plate is already being prepared (de-shined) by the technician at each service — additional buffing at home removes more plate material than necessary and can compromise the next service.
Signs of over-buffed nails
Nails that have been over-buffed over time often display: increased flexibility and bending under light pressure, sensitivity or heat sensation during lamp curing, coatings that lift more readily because the thinned plate flexes more, and a translucent or slightly see-through appearance at the free edge. If any of these are present, a period without buffing — and ideally with a strengthening overlay — is the appropriate response.
Home buffing guide
- Use a block buffer — work through each side in order
- Buff in one direction only — never back and forth
- Use light pressure throughout
- Maximum once per month for most nail types
- Do not buff at home if you regularly wear gel or enhancements
- Do not buff over any area of nail that is lifting, discoloured, or showing signs of a condition
- If nails feel thinner or more flexible after buffing — reduce frequency
Frequently Asked Questions
What is the difference between a nail file and a nail buffer?
A nail file is used to shape and reduce the nail — shaping the free edge, filing enhancements, or de-shining the plate surface. A nail buffer is used to smooth and refine — removing ridges, evening texture, and producing a polished finish. Files come in a wide grit range; buffers operate in the fine to ultra-fine range. They perform different functions and should not be used interchangeably.
Can buffing strengthen nails?
No — buffing removes nail plate material, it does not add to it. A nail that is buffed regularly does not become stronger; it becomes thinner. Nails that appear stronger after buffing are simply more uniform in surface texture — the actual plate thickness has been reduced, not improved. For genuine nail strengthening, a builder product or overlay is the appropriate approach.
How often should I buff my nails?
For most clients, once a month is a reasonable maximum for a full buffing and polishing sequence on natural nails. Less frequently is better for clients with thin or brittle nails. Clients who regularly wear gel or enhancements should not be buffing at home between appointments — the technician performs the preparation buffing at each service.
Why should I buff in one direction only?
Buffing back and forth generates heat through friction, disrupts the nail plate surface unevenly, and removes significantly more material than a directional stroke. A single controlled stroke in one direction achieves a better result with less damage. This applies to all buffing — preparation de-shining and polishing alike.
Can I buff gel nails at home?
Buffing over gel at home is not recommended. Without knowing the remaining thickness of the gel layer, there is a real risk of buffing through the enhancement into the natural nail beneath. If the gel surface needs attention between appointments, contact your nail technician rather than attempting to buff at home.
What does a four-sided block buffer do?
A four-sided block buffer works in sequence — each side performs a different stage of the buffing process. Typically: the first side smooths the surface and removes minor ridges, the second refines and removes scratches from the first stage, the third begins polishing, and the fourth produces a high shine. Each side is used in order, working from the coarsest to the finest stage. Skipping stages leaves deeper scratches that the finer stages cannot fully address.
Related Library Pages
Preparation and Tools
- → Nail Files & Grit Guide
- → Nail Plate Preparation
- → Nail Dehydrator
- → Nail Primers — Acid vs Acid-Free
- → Base Coats
- → Nail Cleansers, Alcohol & Prep Liquids
Techniques
Nail Anatomy
Nail Conditions
Some linked pages are currently in development and will be published progressively.
Professional Disclaimer
The information on this page is provided for educational purposes and is intended to support the professional knowledge of nail technicians and nail educators. Nail services should only be performed by trained professionals. Any client with nail conditions, skin sensitivities, or relevant health concerns should be assessed by a qualified professional before any nail service is undertaken.

About the Author
Radina Ignatova
Professional Nail Expert since 2014 | International Nail Educator | Founder of TheNailWiki and Artistic Touch Nail Training Academy
Radina Ignatova is a Professional Nail Expert since 2014 and an International Nail Educator specialising in advanced nail preparation, BIAB, dual form systems, e-file techniques, and professional salon safety. Based in Scotland, UK, she teaches nail technicians internationally through structured online courses.
Her teaching philosophy is centred on honest education — demonstrating real salon challenges, practical corrections, and performance-based technique rather than presenting only polished results.
Read full bio →About TheNailWiki
TheNailWiki is an independent educational platform dedicated to providing accurate, safety-led and professionally informed nail care information to professionals and enthusiasts worldwide. All content is created by qualified nail industry professionals and reviewed for technical accuracy.
For structured professional training, advanced masterclasses, and specialist technique courses, visit Artistic Touch Nail Training Academy.
This library page is published by TheNailWiki — an independent nail education resource maintained by nail industry professionals. Content is safety-led and professionally informed.