Nail Plate Preparation: The Complete Professional Guide
Author: Radina Ignatova, Professional Nail Expert & International Nail Educator | Last Updated: April 2026
Quick Answer: Nail plate preparation is the process of correctly cleaning, dehydrating, and readying the natural nail surface before any coating or enhancement is applied. It is the single most influential factor in how long a nail service lasts and whether a coating bonds correctly. No product — regardless of brand or quality — can compensate for inadequate preparation of the nail plate.
Quick Summary
Nail plate preparation refers to every step taken on the natural nail before product application begins — from cuticle work and surface cleansing through to dehydration and priming. The goal is to create a clean, dry, oil-free surface to which a coating or enhancement product can bond directly and reliably.
Preparation requirements differ depending on the service being performed — gel polish, BIAB, dual form enhancements, or traditional nail enhancements each place different demands on the nail surface — but the underlying principle is the same for all of them: the nail plate must be correctly prepared before any product is applied, and no amount of product quality or technique skill compensates for skipping or rushing this stage.
Contents
Why Nail Preparation Matters
The bond between a nail coating and the natural nail plate is entirely dependent on the condition of the nail surface at the moment of application. A coating does not adhere to oil, moisture, dead skin, or debris — it adheres to the nail plate itself. Anything sitting between the product and the plate at the point of application will compromise that bond, and once the product has cured, that compromise is locked in.
This is why preparation is the foundation of every nail service, not a preliminary step that can be shortened when time is limited. Lifting, chipping, premature service breakdown, and poor longevity are most frequently caused by inadequate preparation — not by product failure, application technique, or client aftercare. The product can only perform as well as the surface it is applied to.
Preparation failures are invisible until the service fails. A nail that looks ready may still have surface oils, traces of dead cuticle, or residual moisture that prevent full adhesion. These are not visible to the eye but become apparent when a coating lifts from the cuticle edge within days of application, or when an enhancement separates cleanly from the nail plate on impact rather than flexing with it.
For clients, poor preparation means shorter-lasting services and more frequent maintenance. For nail professionals, it means callbacks, repairs, and — if product lifting re-exposes uncured material to the skin — potential sensitisation risk for the client. Correct preparation protects both parties. See: Contact Sensitisation and Nail Allergies →
© TheNailWiki
Understanding the Nail Plate Surface
The nail plate is a hardened keratin structure produced by the nail matrix and resting on the nail bed — together these structures form the nail unit. Its surface is naturally smooth but carries a natural layer of oils and moisture — both produced by the nail itself and absorbed from the environment — that must be addressed during preparation before any product is applied.
At the proximal end of the nail plate — closest to the eponychium and cuticle — dead cuticle tissue typically adheres to the plate surface as the nail grows forward. This dead skin is transparent and easy to miss, but it sits directly between the nail plate and any product applied over it. Coatings applied over residual dead cuticle will not bond to the nail — they bond to the dead skin, which then separates naturally from the plate during normal nail growth and takes the coating with it.
This is one of the most common causes of cuticle-area lifting — not a product application problem, but a preparation problem that was present before the product was ever applied.
What the nail plate needs to be at the point of application
- Free of all dead cuticle and skin debris across the entire plate surface
- Free of surface oils — both natural and from hand creams, soaps, or other contact
- Free of moisture — including any absorbed during soaking or washing
- Lightly buffed or etched to create a receptive surface without over-thinning the plate
- Dehydrated and primed where the product system requires it
Cuticle Work and Dead Tissue Removal
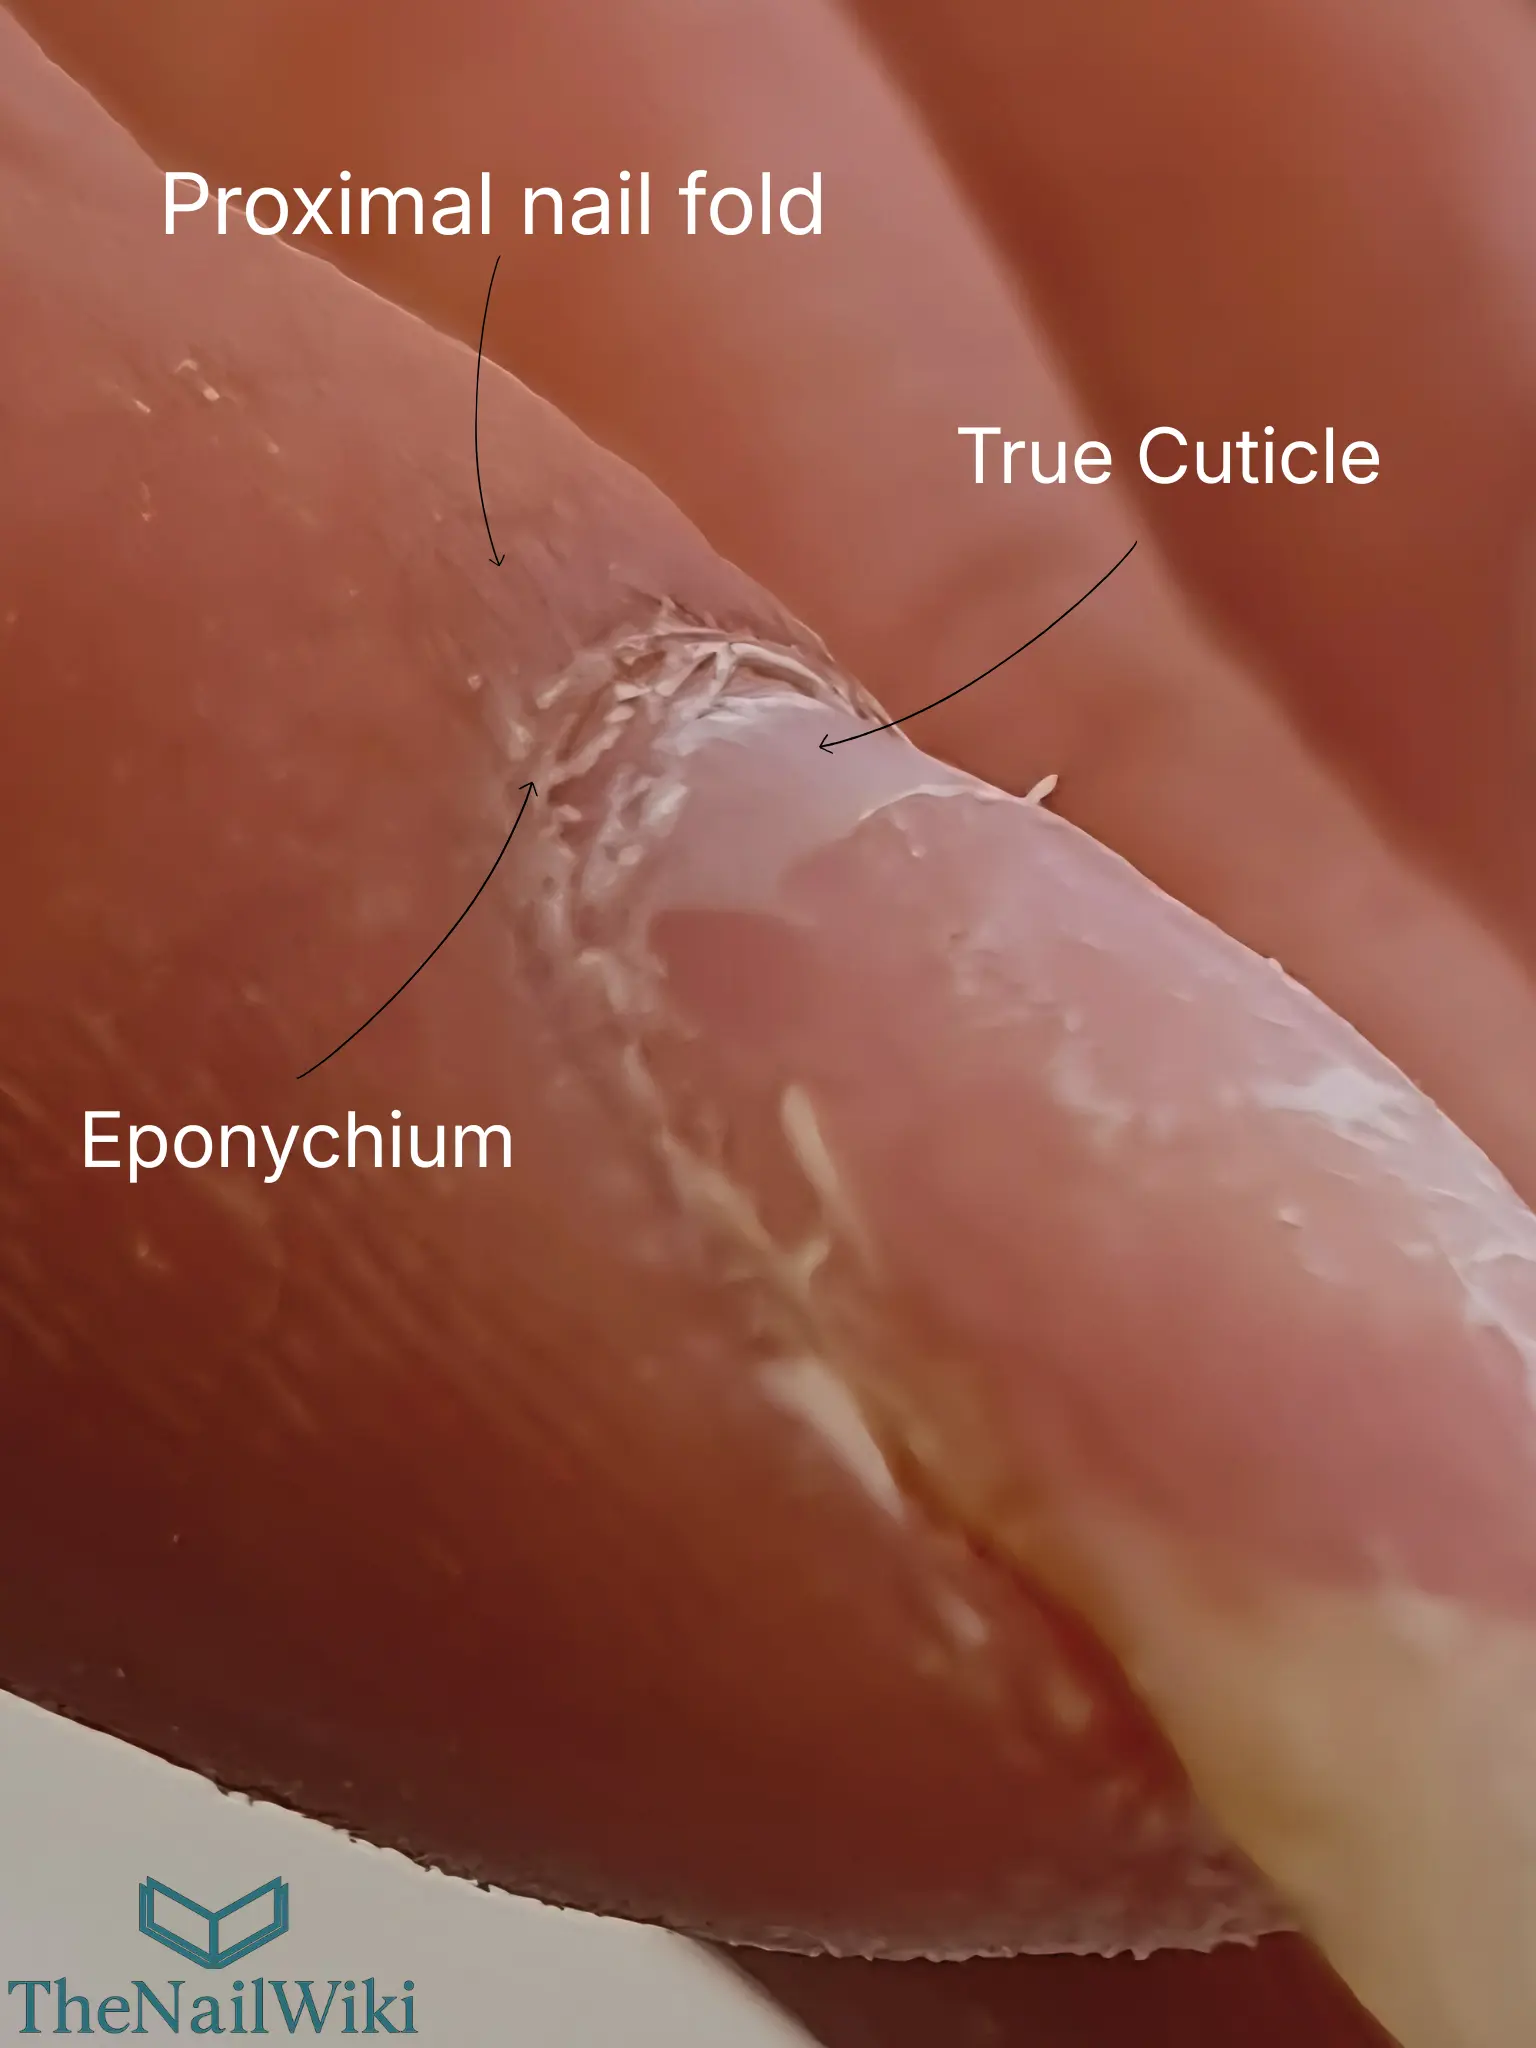
The first and most critical step of nail preparation is the removal of dead cuticle from the nail plate surface. The true cuticle — the thin, transparent layer of dead skin that adheres to the plate as it grows — must be completely removed before any product is applied. This is distinct from the living eponychium, which is the living skin at the base of the nail.
Manual preparation and its limitations
Manual cuticle preparation — using a cuticle pusher, orangewood stick, or similar tool — is the most basic form of cuticle work and is widely taught as a starting point. However, manual preparation has clear limitations. It is difficult to fully remove all dead cuticle from the nail plate surface using manual tools alone, particularly in the fine zone closest to the skin and along the lateral edges. Areas of dead skin that are very thin, tightly adhered, or located in tight spaces around the nail fold are routinely missed with manual techniques.
When dead cuticle is left on the plate — even a thin, barely visible layer — the coating bonds to that skin rather than the nail. The result is early lifting at the cuticle edge, regardless of the product quality or application skill used afterwards.
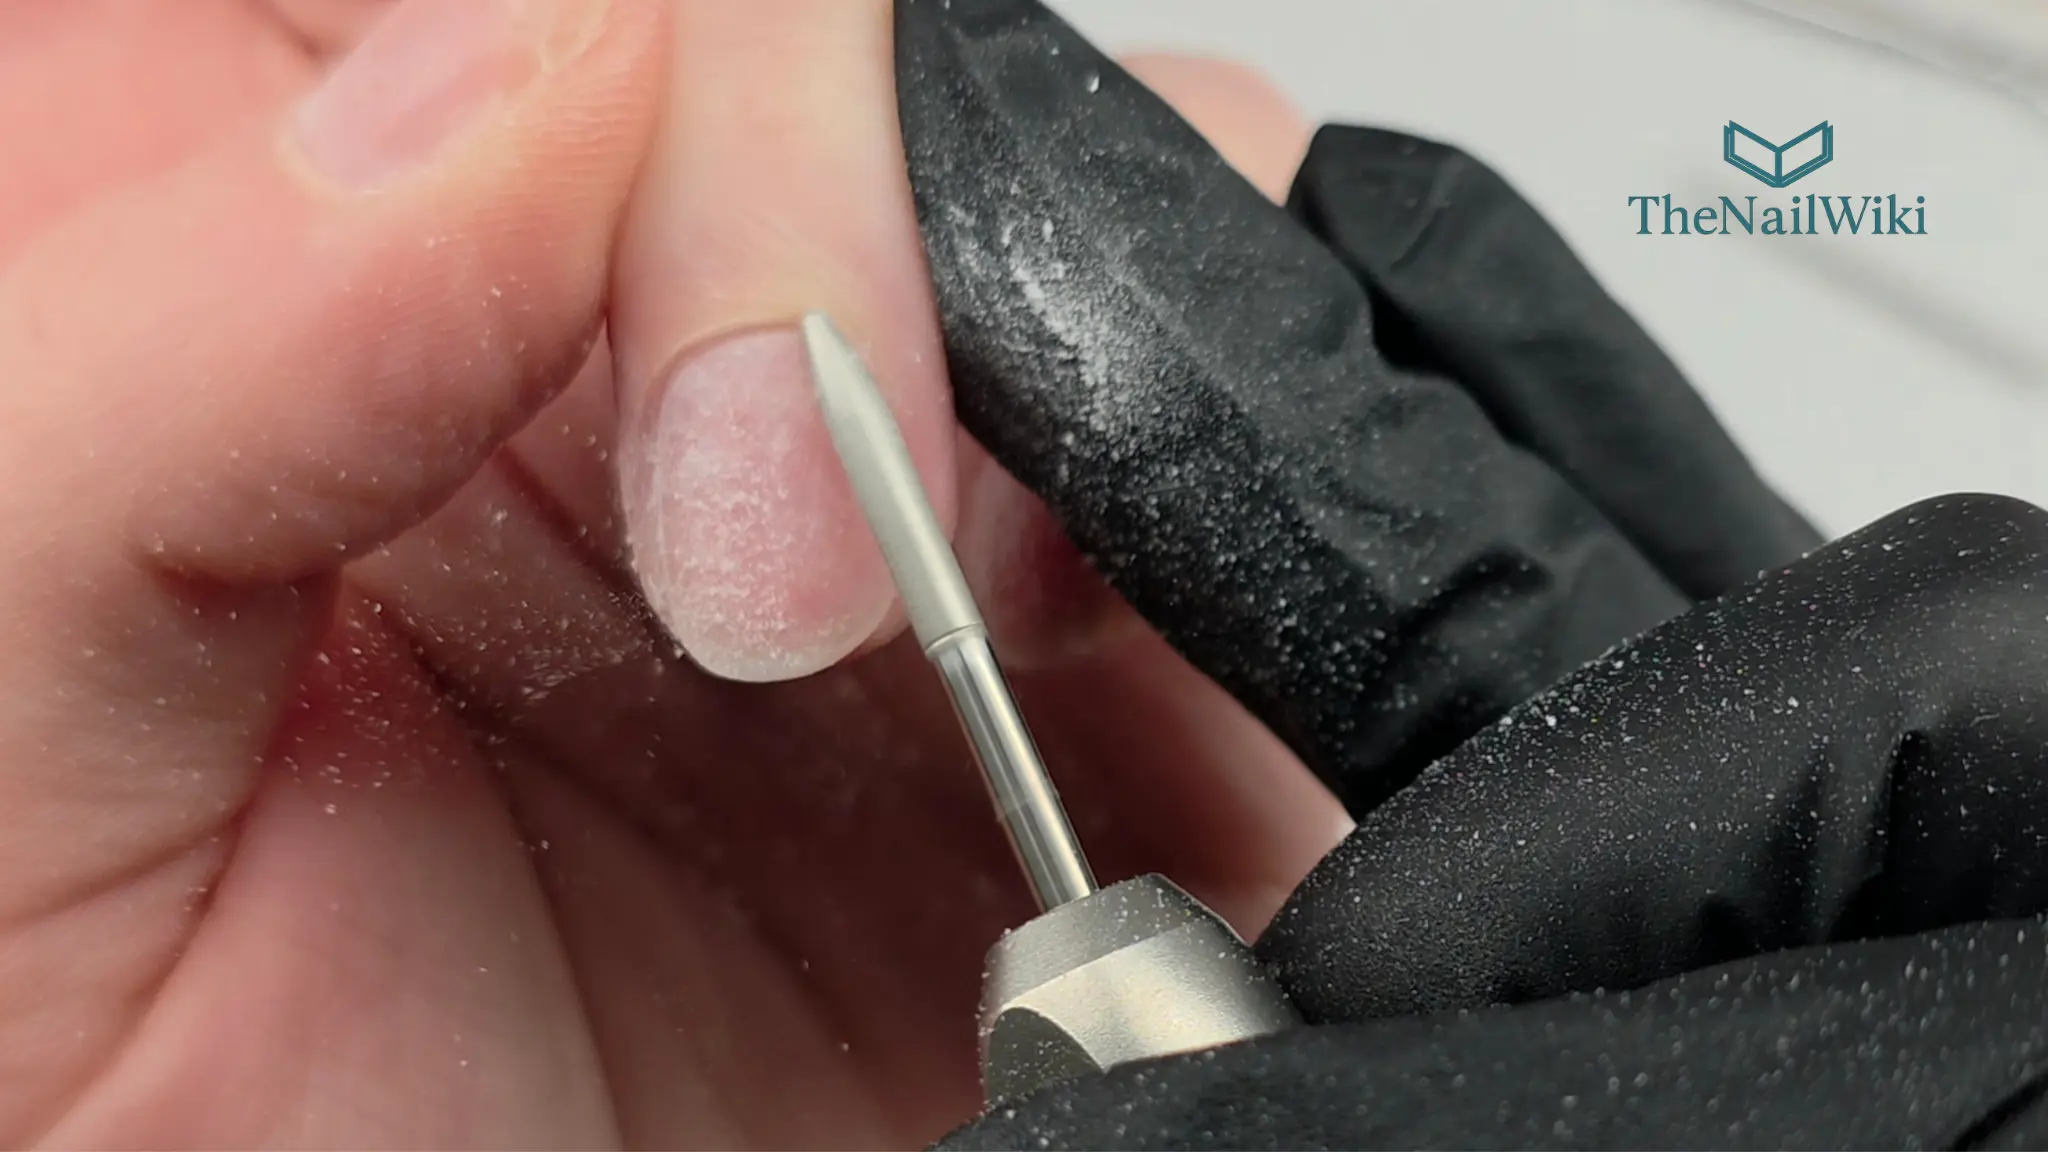
E-file preparation — a more thorough standard
E-file preparation uses diamond e-file bits to remove dead cuticle from the nail plate with a level of precision and thoroughness that manual tools cannot match. Fine-grit diamond bits can access the full plate surface including the very edge of the cuticle zone and the lateral nail folds, and can remove even tightly adhered dead skin that would be left behind by a pusher alone.
The result is a significantly cleaner plate surface — and a measurably longer-lasting service. E-file preparation is standard practice in professional European nail technique and is the preparation method of choice for any technician prioritising longevity and precision.
Russian Manicure represents the most thorough application of e-file preparation — an entirely dry technique that addresses not just the nail plate but the lateral nail folds, surrounding skin, and the full cuticle zone using a systematic sequence of e-file bits. It is the gold standard for nail plate preparation and produces preparation results that manual technique simply cannot replicate.
© TheNailWiki
Dry preparation — why soaking is counterproductive
All professional nail preparation for gel-based services and enhancements should be performed on dry nails. Water causes the nail plate to temporarily swell — and any product applied to a swollen plate will be bonding to a surface that is larger than its natural, contracted state. When the plate dries, micro-gaps form between the product and the nail. Russian Manicure technique specifically avoids water at every stage for this reason — preparation is done entirely dry, from start to finish. See: Russian Manicure →
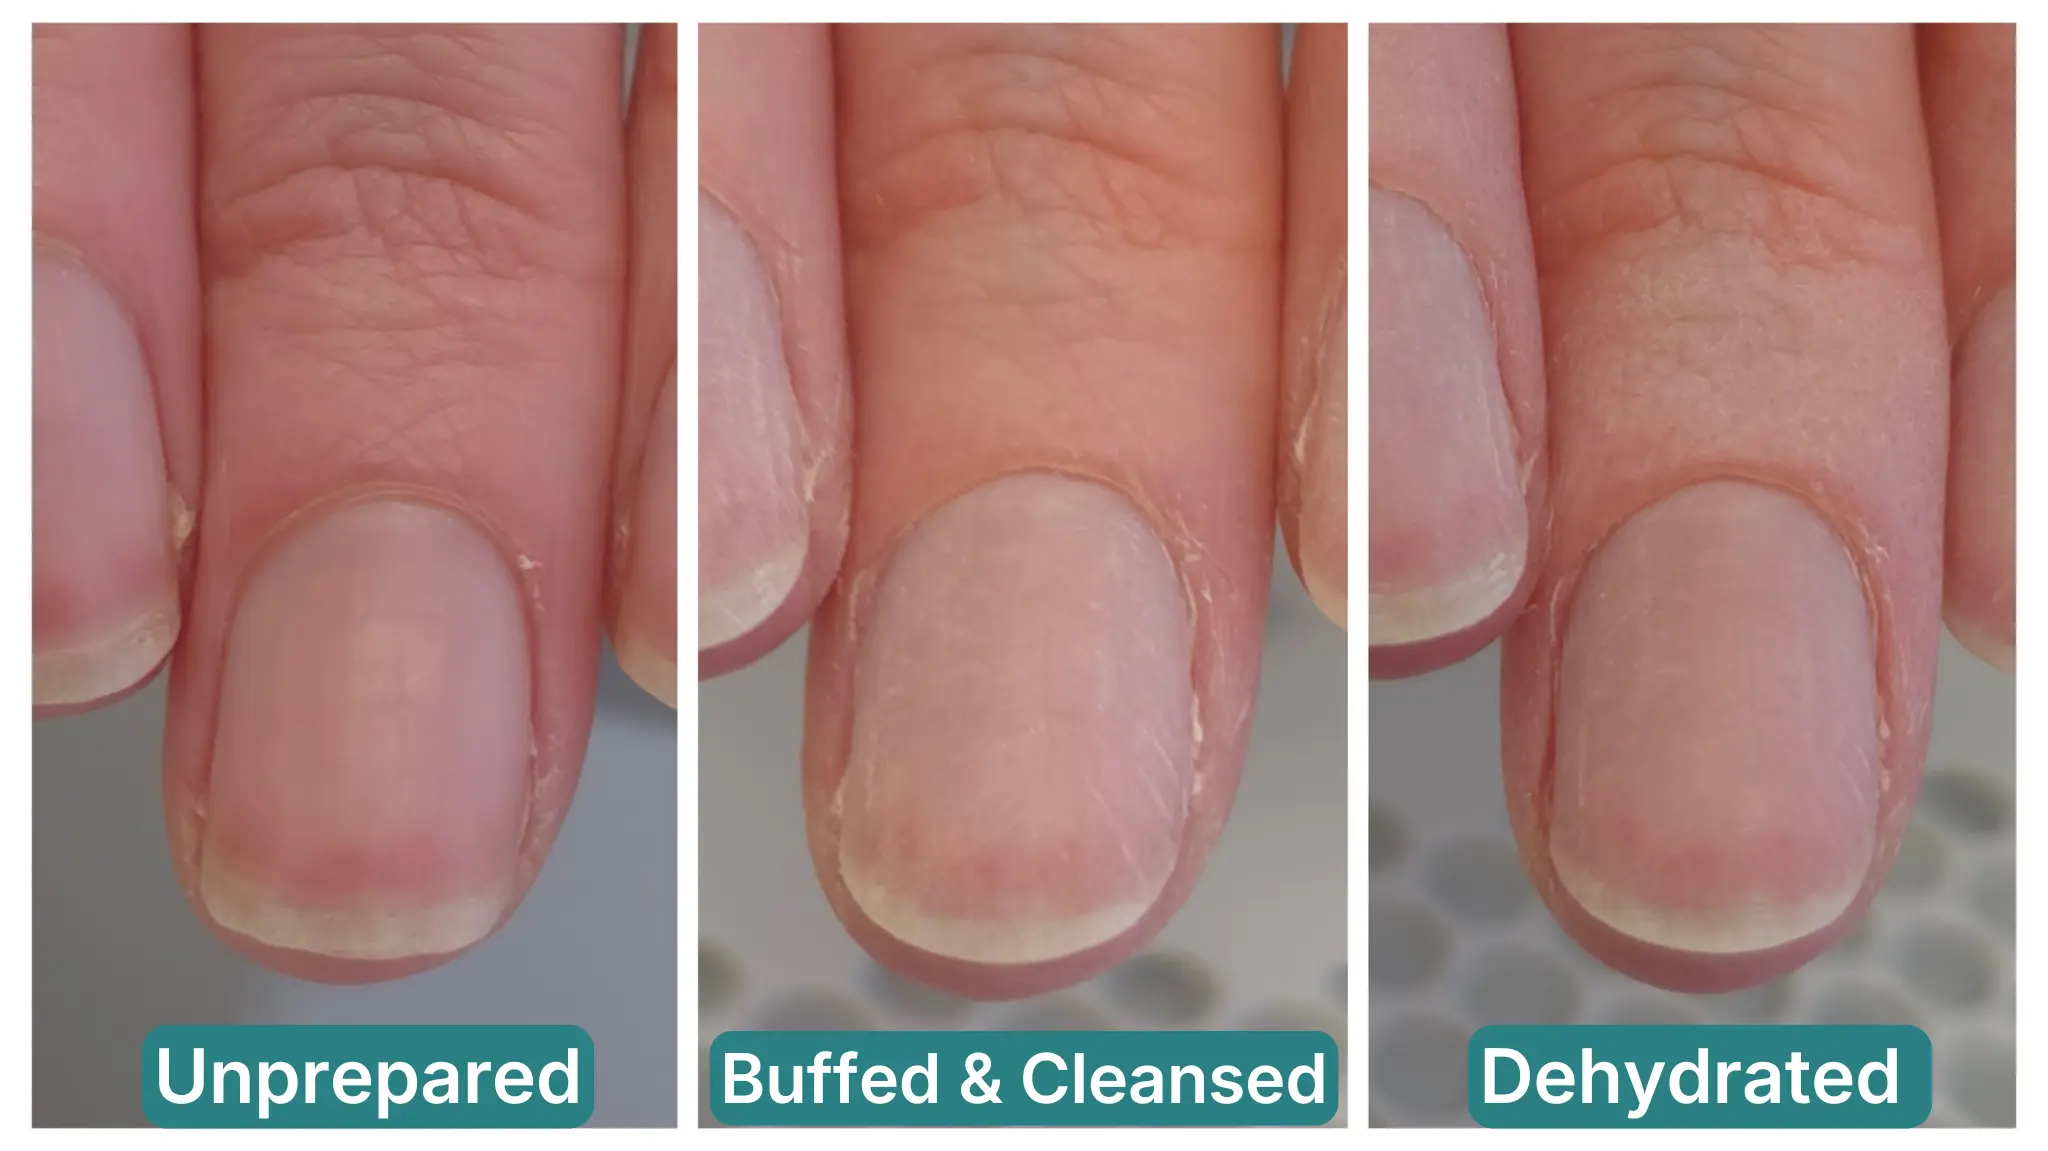
What complete cuticle removal looks like
When the dead cuticle has been fully removed, the nail plate at the proximal end has a clean, sharp boundary where it meets the skin. There is no translucent film covering the plate surface. The nail plate itself appears consistent in texture from the cuticle edge to the free edge. If any area of the plate appears slightly hazy, filmy, or has a different texture from the surrounding nail, dead cuticle may still be present.
© TheNailWiki
In European nail technique, cuticle work also includes careful cutting where needed — removing lifted or excess dead skin using professional cuticle nippers as part of a thorough preparation sequence. This is a standard and accepted part of professional nail preparation when performed correctly and with the appropriate training. For a full explanation of the distinction between dead cuticle and the living eponychium, see: The Eponychium and Cuticle →
Surface Preparation — Buffing, Etching, and Cleansing
Once the dead cuticle has been removed, the nail plate surface is prepared to receive the product. This involves de-shining the surface — removing its natural gloss so the product has a receptive surface to adhere to — cleansing away all dust and debris, and ensuring nothing remains on the nail that would prevent adhesion.
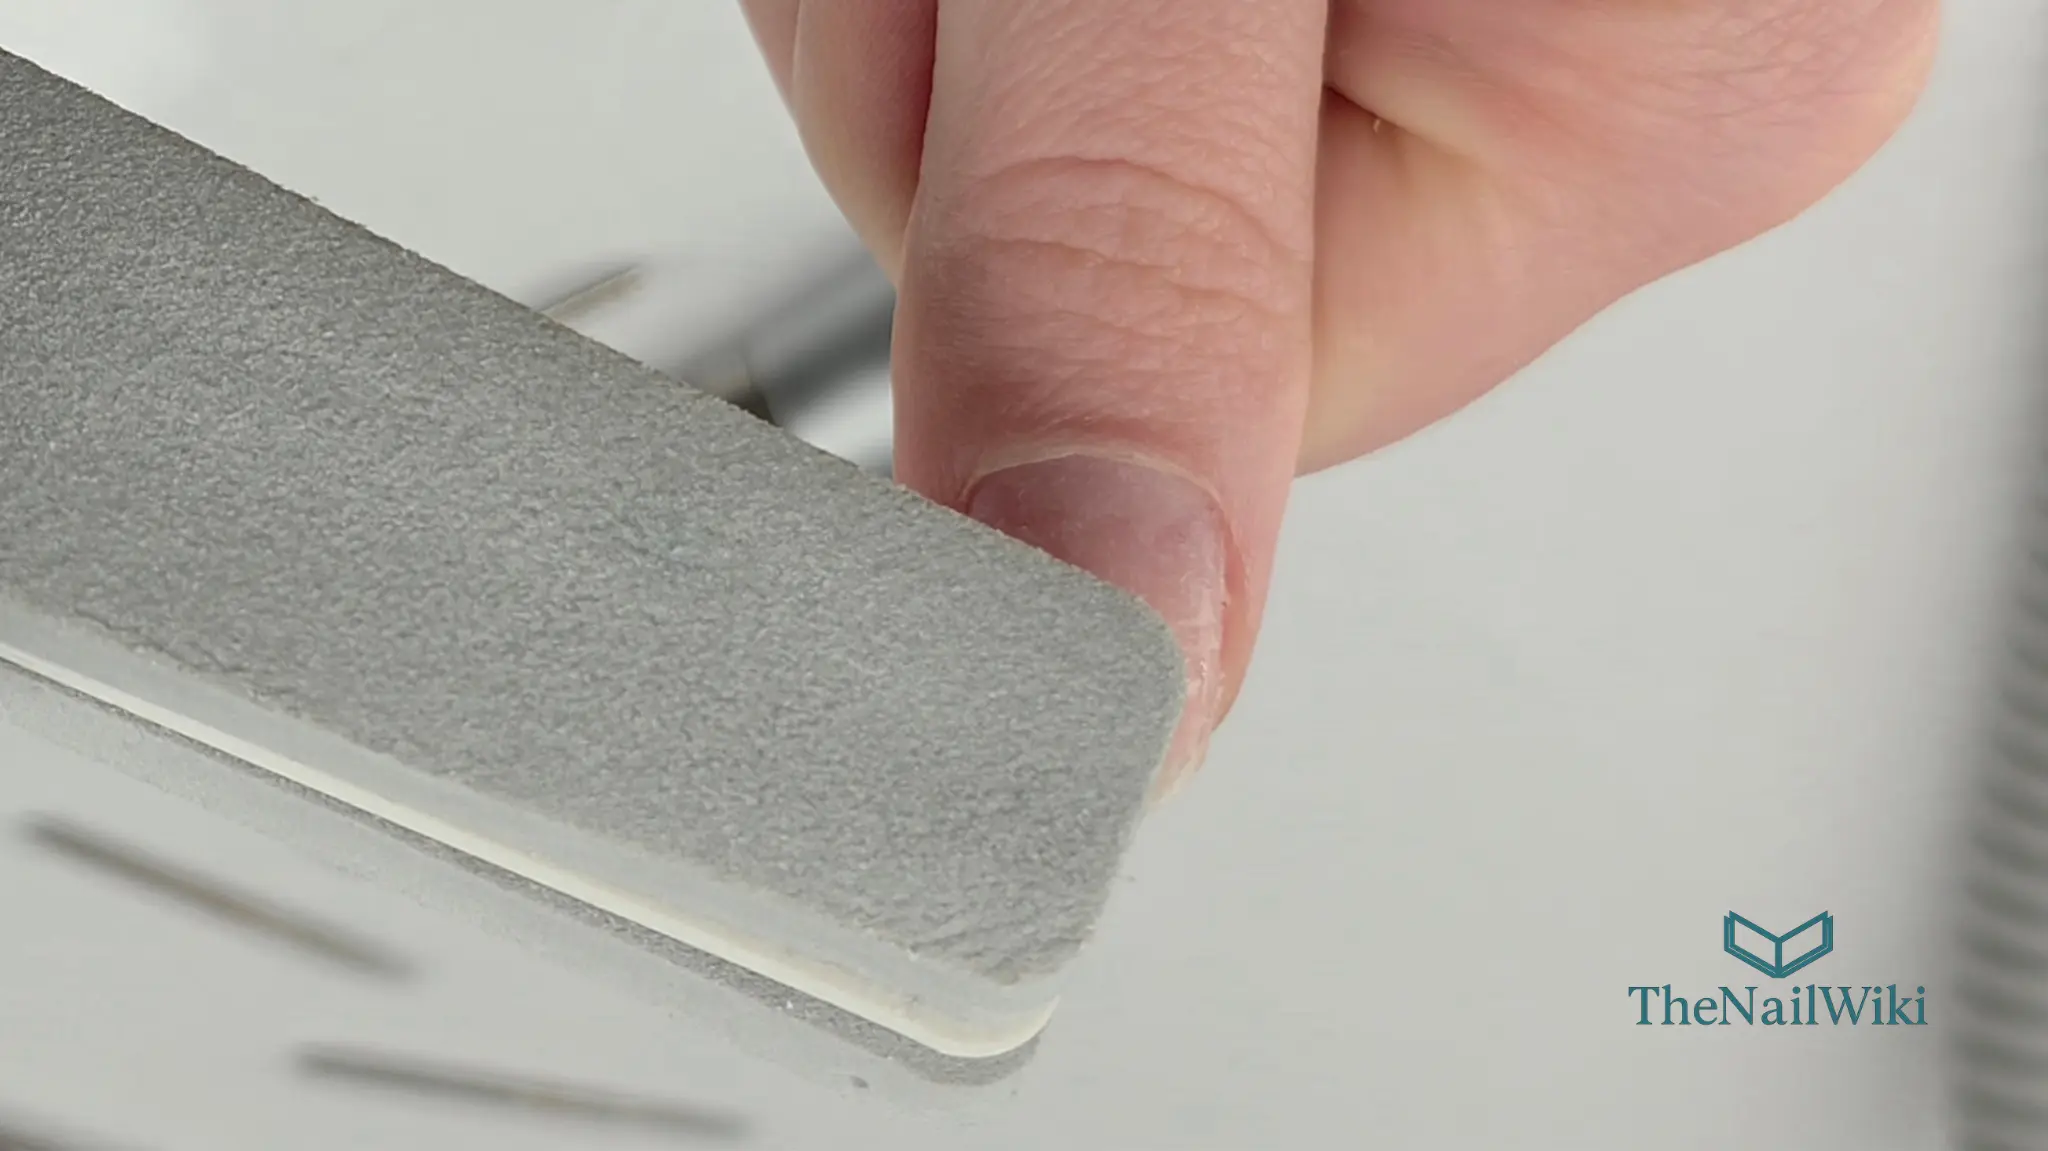
Surface etching and de-shining
The natural nail plate surface is smooth and has a degree of shine. Before product application, this shine must be removed using a buffer or fine-grit file — a process sometimes called de-shining or surface etching. This creates a slightly textured surface that gives the product something to key into and improves adhesion.
Buffing must always be done in one direction — working in a single stroke with the natural growth of the nail rather than scrubbing back and forth. Moving the buffer in multiple directions causes the nail surface fibres to be disrupted unevenly, which can create micro-tears in the plate surface and visible scratches that may show through thinner coatings.
© TheNailWiki
Grit guide — what is safe for natural nails
The grit of a file or buffer determines how abrasive it is — the lower the number, the more abrasive. For de-shining the natural nail plate, a 240-grit buffer is the most commonly used and is considered the safe standard. It removes the shine without significantly thinning the plate. Read more: Nail Files & Grit Guide →
⚠️ Grit red flag — below 180 on natural nails
If a product manufacturer instructs you to use a file or buffer below 180 grit — such as 100 or 80 — on the natural nail plate as part of their preparation protocol, this is a significant red flag. Files in the 80–150 grit range are designed for shaping enhancements and removing product — they are far too abrasive for the natural nail plate and will thin and damage it with repeated use. A 240-grit buffer is the appropriate choice for de-shining the natural nail. Any manufacturer specifying more aggressive prep than this on natural nails warrants serious scrutiny of their product system.
HEMA-free gel polish and buffing requirements
Modern HEMA-free gel polish formulations — developed in response to growing awareness of contact sensitisation — may require more surface preparation than traditional gel polish in order to achieve adequate adhesion. Because HEMA plays a significant role in bonding in conventional formulas, HEMA-free versions sometimes compensate by requiring a more thorough de-shine or a specific bonding base. Always follow the individual manufacturer’s preparation guidance for their specific product system — preparation requirements are not universal across all gel polish brands.
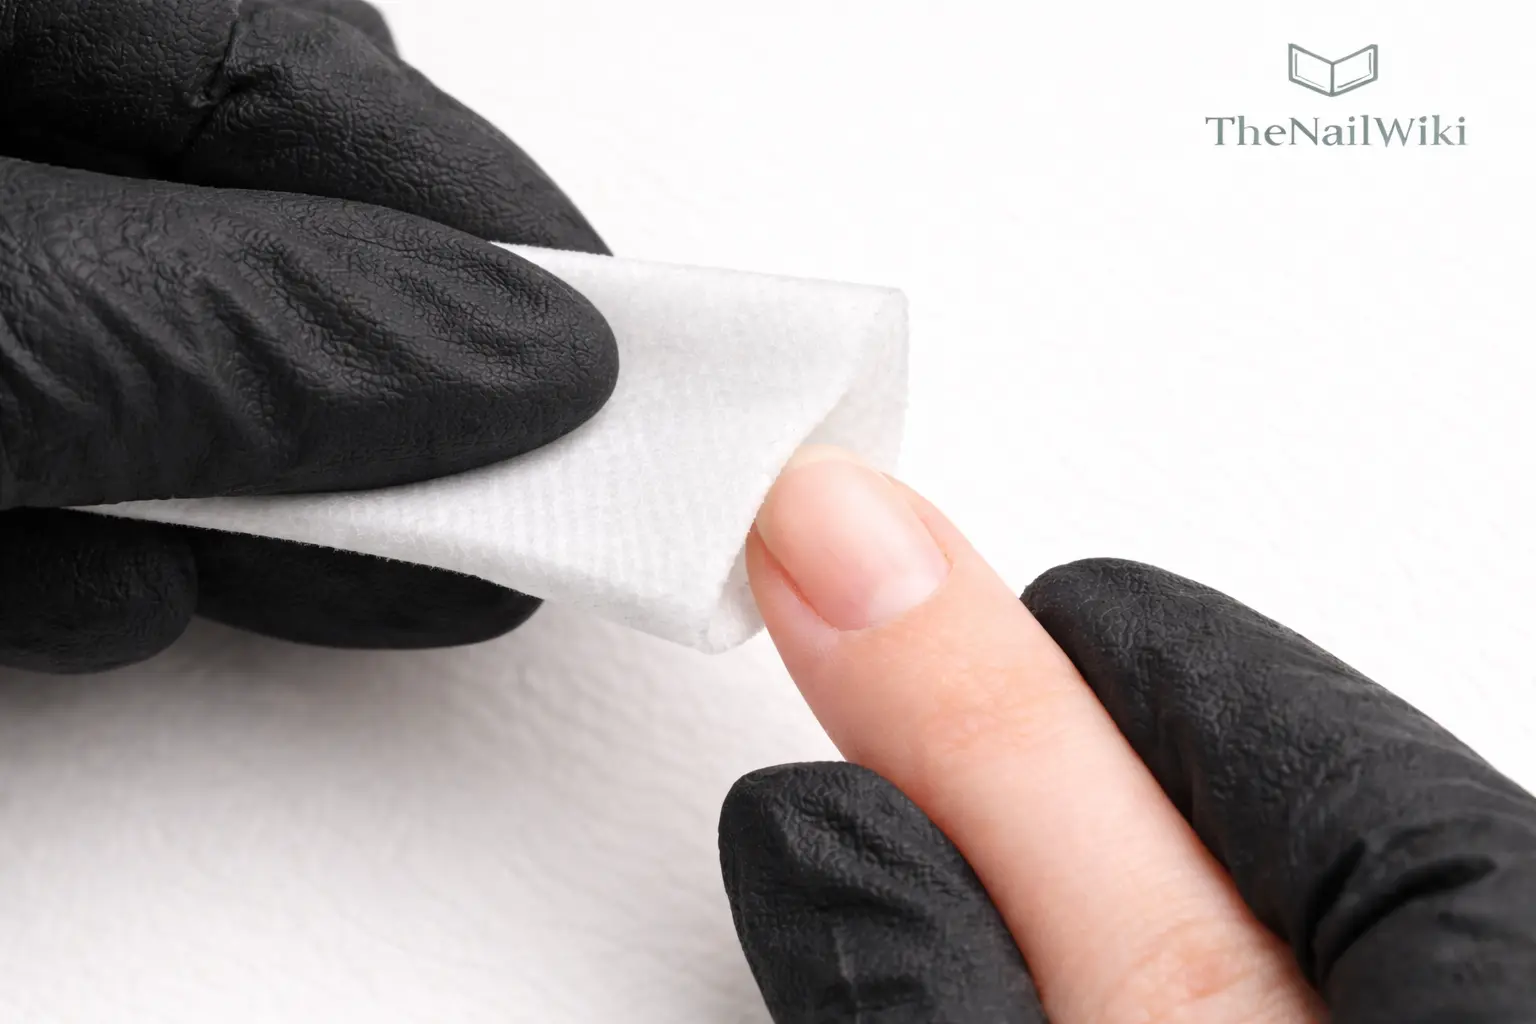
Cleansing the nail surface
After de-shining, the nail surface must be cleansed thoroughly to remove all buffing dust, debris, and any oils disturbed during the process. A lint-free wipe saturated with a professional nail cleanser or isopropyl alcohol is used to wipe the nail plate. Cotton wool should never be used — cotton fibres left on the nail surface cause the same adhesion problems as dust and debris.
Once the nail has been cleansed, it must not be touched with bare fingers before product is applied. Natural skin oils transfer instantly to the nail surface and undo the cleansing step entirely. Clients should also be reminded not to touch their face, hair, or any other surface with their freshly cleansed nails during the appointment — any contact reintroduces oil and debris to the prepared plate.
© TheNailWiki
Do not touch the nail plate after cleansing — and remind clients not to either. A single contact with bare skin — whether the technician’s fingers or the client touching their face or hair — deposits enough surface oil to compromise adhesion at that point. Once cleansed, the nail must remain untouched until product is applied.
Dehydration and Priming
The final steps of nail preparation before product application are dehydration and — where required by the product system — priming. These are distinct steps with different functions, and confusing them or substituting one for the other is a common preparation error.
Dehydration
A nail dehydrator is applied to the nail plate immediately before priming or product application. Its function is to remove the final traces of surface moisture and oils from the plate — the residual layer that cleansing alone cannot fully address. Dehydrators typically evaporate quickly and leave no residue on the nail surface.
Dehydration is particularly important for clients whose nails tend to be naturally oily, for services performed in humid environments, or for any client who has recently used hand cream, soap, or sanitiser before their appointment. It is a low-risk, high-benefit step that takes seconds and significantly improves adhesion consistency.
© TheNailWiki
Priming
A nail primer creates a chemical or physical bridge between the nail plate and the product being applied. Not all nail services require a primer — gel polish systems often do not, whilst some builder gel and enhancement systems either require or strongly benefit from one. Always follow the product manufacturer’s guidance on whether a primer is required for their specific system.
Primers fall into two broad categories: acid primers, which chemically etch the nail plate surface to improve adhesion (used primarily with acrylic systems and with great caution), and acid-free primers, which work through molecular bonding rather than surface etching and are more commonly used with gel-based systems. Using an acid primer on a nail that has already been over-buffed can cause significant damage — the two preparation steps must be understood and controlled in relation to each other.
Base coats
Many product systems incorporate a base coat as the first layer of product application — distinct from a primer, though the two are sometimes confused. A base coat is a gel product that bonds to the prepared nail plate and creates a foundation for the colour or builder gel applied over it. Some base coats also have bonding properties similar to a primer. Individual systems vary — always refer to the manufacturer’s protocol.
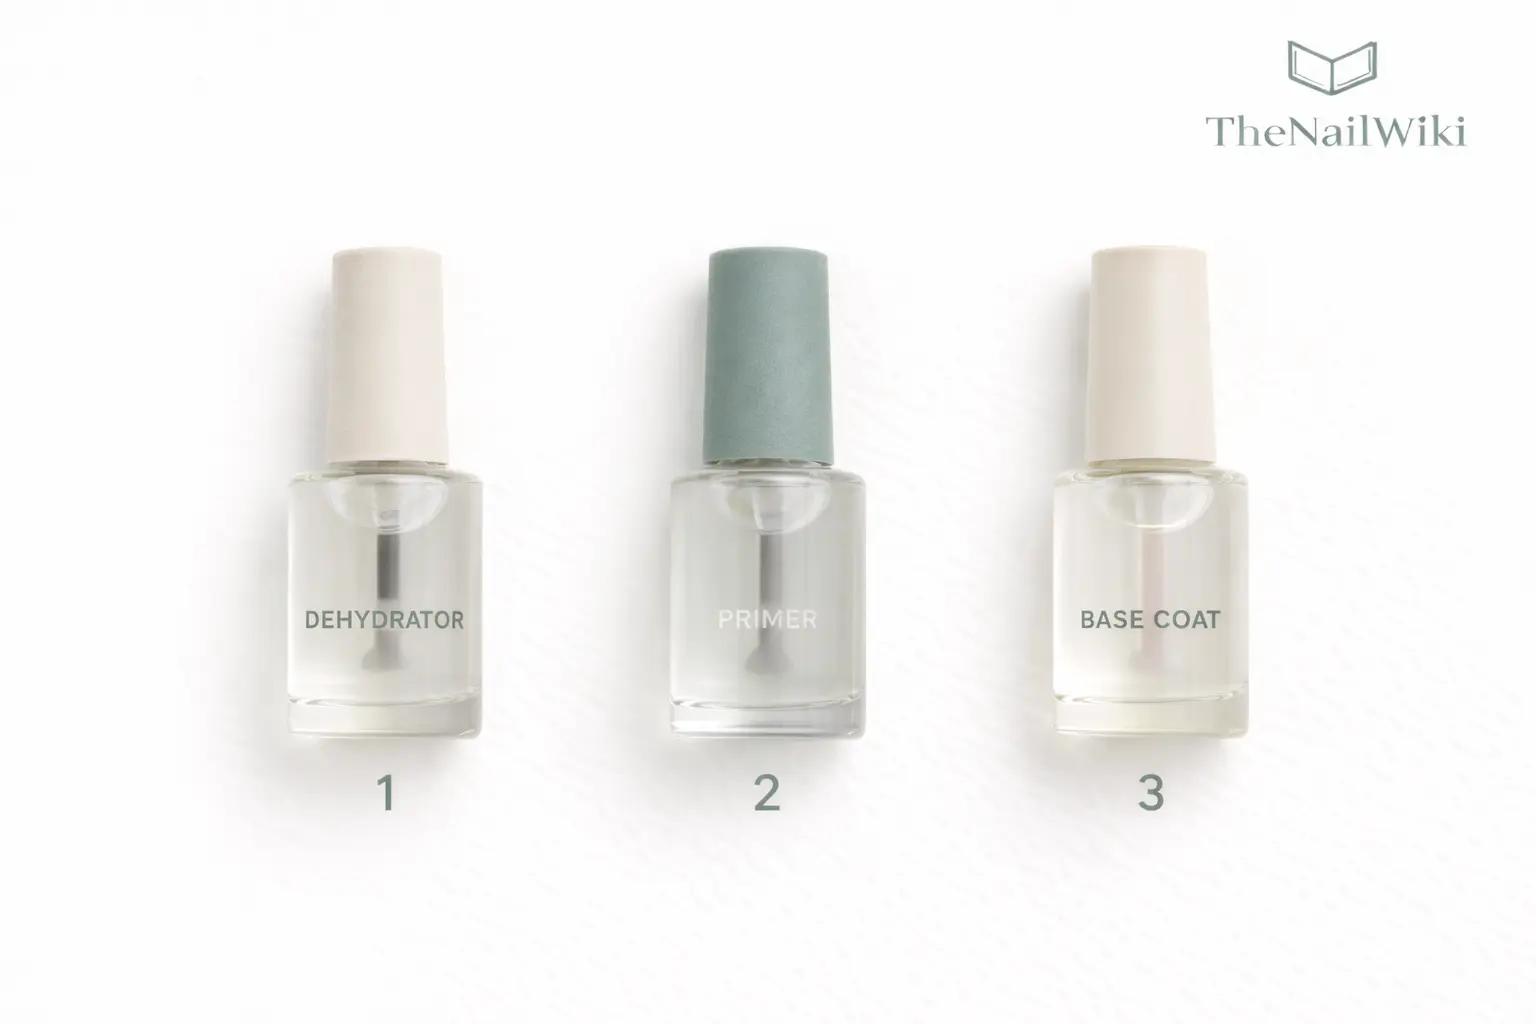
Preparation product sequence
- 1. Dehydrator — removes moisture and surface oils
- 2. Primer (if required by the system) — creates bonding surface
- 3. Base coat (if part of the system) — first product layer
- Dehydrator and primer are not interchangeable — they perform different functions
- Not every service requires all three — always follow the specific product system’s protocol
Preparation by Service Type
The core principles of nail preparation apply to every service. BIAB, builder gel, dual forms, and traditional enhancements all require the same level of thorough preparation — the main distinction is between these services on one side, and gel polish and regular nail polish on the other, which require a lighter touch.
BIAB, builder gel, dual forms, and traditional enhancements
BIAB, builder gel, dual form enhancements — including the Sandwich Dual Form System — and traditional nail enhancements all require the same thorough preparation: complete dead cuticle removal from the entire plate surface, buffing to de-shine, thorough cleansing, dehydration, and priming or base coat where required by the product system.
These services all sit in a thicker layer on the nail, bond to the entire plate surface, and are expected to last weeks. Any preparation shortcut is amplified — a small area of unremoved dead cuticle that might cause minor lifting in a thin gel polish becomes a significant structural issue in a builder gel or enhancement service.
For dual form enhancements in particular, preparation failures are sealed in during application — the form is pressed onto the nail in one action, and any inadequate preparation is locked in place immediately. There is no opportunity to correct it mid-application.
Gel polish
Gel polish sits in a thinner layer than builder products and preparation is lighter — typically cuticle work, a light de-shine, thorough cleansing, and dehydration. Priming is not required for most gel polish systems, though some include a bonding base. Modern HEMA-free gel polish formulations may require more buffing than traditional systems — check the manufacturer’s specific preparation protocol.
Even for gel polish, the cuticle edge is the most common lifting point — and it is caused by the same problem as in every other service: dead cuticle left on the plate at the proximal zone before application.
Professional training in nail preparation
Nail preparation technique — including cuticle work, correct buffing, dehydration, priming, and preparation for specific product systems — is covered in full in the Nail Plate Preparation online course at Artistic Touch Nail Training Academy.
Common Preparation Mistakes
Leaving dead cuticle on the nail plate
The most common cause of cuticle-area lifting across all services. Dead cuticle is often transparent and easy to miss, particularly at the very edge of the plate closest to the skin. Any product applied over it will lift when the dead skin naturally separates from the plate.
Touching the nail plate after cleansing
A single fingerprint on a freshly cleansed nail plate deposits enough surface oil to create a lifting point. This applies to the technician and the client — remind clients not to touch their nails, face, or hair after the cleansing step.
Soaking the nails before gel or enhancement services
Water causes the nail plate to temporarily swell. Any gel-based product applied to a swollen plate will be sitting on an expanded surface — when the plate contracts back to its natural state as it dries, micro-gaps form between the product and the nail. All gel and enhancement preparation should be performed on completely dry nails.
Buffing in multiple directions
Buffing must be done in one direction only. Moving the buffer back and forth disrupts the nail plate surface unevenly, can cause visible scratches, and places unnecessary mechanical stress on the plate. A single, even stroke in one direction is sufficient to de-shine the nail.
Over-buffing the nail plate
Buffing is necessary but should be light and even. Aggressive buffing thins the nail plate, which causes heat sensitivity during lamp curing and structural weakness over time. The goal is to remove the shine — not to significantly alter plate thickness.
Skipping dehydration
Cleansing removes visible debris and most surface oil, but does not address residual moisture within the surface layer of the nail. Skipping dehydration — particularly for clients with naturally oily nails or those who have recently used hand products — leaves the nail in a state that looks prepared but is not fully ready for product adhesion.
Using cotton wool instead of lint-free wipes
Cotton fibres left on the nail surface sit between the product and the plate in exactly the same way as dust or dead cuticle — and create the same adhesion problems. Always use lint-free wipes for cleansing and product application steps.
What Clients Should Know
Clients play a direct part in how well a nail service performs. Preparation begins before the appointment — arriving with oily, treated, or recently washed hands makes the technician’s preparation significantly harder and can affect the outcome of the service regardless of how thorough the technician’s technique is.
A full client pre-appointment guide and consultation form is shared before every appointment. The key points regarding nail preparation are summarised below. See: Nail Consultation →
How to arrive for a nail appointment
- Do not apply hand cream, cuticle oil, or any oil-based product on the day of the appointment. If applied, the nails must be very thoroughly cleansed at the salon before preparation can begin — this takes additional time and the result may still be affected
- Do not apply moisturiser to the hands or nails on the day of the appointment for the same reason
- Avoid washing your hands immediately before the appointment if possible — or dry them very thoroughly if you do
- Do not arrive with nail polish remover still on the nails — solvent residue affects the plate surface
- Avoid gel sanitiser on the hands immediately before the appointment
- Once your nails are cleansed during the appointment, do not touch your face, hair, or any other surface — this reintroduces oil and debris to the prepared nail plate
- Inform your technician of any new medications, particularly those affecting circulation, immunity, or skin condition
If a service lifts or fails prematurely, preparation is the most likely cause — not the product and not aftercare alone. A correctly prepared nail with correctly applied product and reasonable aftercare should last the expected duration of the service. If retention is consistently poor, the preparation process — and what happens before the appointment — is the first thing to review.
Clients who experience repeated lifting despite regular appointments may benefit from discussing whether additional preparation steps — such as a dehydrating base or primer — would help their specific nail type. Some nails are naturally more prone to surface oils, and this can be addressed with adapted preparation rather than accepting poor retention as inevitable. Check also: Contraindications in Nail Services →
Frequently Asked Questions
Why does gel polish lift at the cuticle even when it is freshly done?
Cuticle-area lifting is almost always caused by dead cuticle that was not fully removed from the nail plate before application. The product bonds to the dead skin rather than the nail — and when that skin naturally separates from the plate as the nail grows, the product lifts with it. The solution is thorough cuticle work during preparation, not a different product.
Does soaking nails before a gel service cause lifting?
Yes — soaking causes the nail plate to temporarily swell. Gel applied to a swollen plate sits on an expanded surface. When the plate dries and contracts, micro-gaps form between the gel and the nail. All gel-based services should be performed on completely dry nails from the start of preparation through to product application.
Is buffing the nail plate damaging?
Light, correctly performed buffing with the appropriate grit is not damaging. Over-buffing — using too coarse a grit, applying too much pressure, or buffing in multiple directions — thins the plate over time and can cause sensitivity and structural weakness. A 240-grit buffer is the safe standard for de-shining the natural nail plate during preparation.
What is the difference between a dehydrator and a primer?
A dehydrator removes moisture and surface oils from the nail plate. A primer creates a chemical or physical bond between the nail plate and the product. They perform different functions and are applied in sequence — dehydrator first, then primer where required. They are not interchangeable, and not every service requires both.
Can preparation fix a naturally oily nail?
Yes — naturally oily nails are one of the most common reasons for adhesion problems, but they can be managed with thorough preparation. A dehydrator is particularly important for oily nail types. Some clients also benefit from a bonding base or primer adapted to their nail chemistry. The solution is adapted preparation, not a different product system.
Where can I learn professional nail preparation technique?
Nail preparation technique — including cuticle work, e-file preparation, correct buffing, dehydration, priming, and preparation for specific product systems — is covered in full in the Nail Plate Preparation online course at Artistic Touch Nail Training Academy.
Related Library Pages
Preparation Products
- → Nail Files & Grit Guide
- → Nail Buffers Guide
- → Nail Dehydrator
- → Nail Primer — Acid vs Acid-Free
- → Base Coats
- → Nail Cleanser, Alcohol & Prep Liquids
Techniques
- → Russian Manicure
- → E-File Manicure
- → Sandwich Dual Form System
- → Dual Forms
- → BIAB — Builder In A Bottle
- → Gel Polish Explained
Nail Anatomy
Professional Safety
- → Nail Patch Testing
- → Contact Sensitisation and Nail Allergies
- → Nail Consultation
- → Contraindications in Nail Services
- → Onycholysis
Some linked pages are currently in development and will be published progressively.
Professional Disclaimer
The information on this page is provided for educational purposes and is intended to support the professional knowledge of nail technicians and nail educators. Nail services should only be performed by trained professionals. Any client with nail conditions, skin sensitivities, or relevant health concerns should be assessed by a qualified professional before any nail service is undertaken.
About the Author
Radina Ignatova
Professional Nail Expert since 2014 | International Nail Educator | Founder of TheNailWiki and Artistic Touch Nail Training Academy
Radina Ignatova is a Professional Nail Expert since 2014 and an International Nail Educator specialising in advanced nail preparation, BIAB, dual form systems, e-file techniques, and professional salon safety. Based in Scotland, UK, she teaches nail technicians internationally through structured online courses.
Her teaching philosophy is centred on honest education — demonstrating real salon challenges, practical corrections, and performance-based technique rather than presenting only polished results.
Read full bio →About TheNailWiki
TheNailWiki is an independent educational platform dedicated to providing accurate, safety-led and professionally informed nail care information to professionals and enthusiasts worldwide. All content is created by qualified nail industry professionals and reviewed for technical accuracy.
For structured professional training, advanced masterclasses, and specialist technique courses, visit Artistic Touch Nail Training Academy.
This library page is published by TheNailWiki — an independent nail education resource maintained by nail industry professionals. Content is safety-led and professionally informed.