Free Edge: Anatomy, Structure, and Role in Nail Services
Author: Radina Ignatova, Professional Nail Expert & International Nail Educator | Last Updated: May 2026
Quick Answer: The free edge is the distal portion of the nail plate that extends beyond the fingertip — past the nail bed and the hyponychium — with no underlying tissue beneath it. It is the oldest, most fully keratinised portion of the nail plate, and the part that is shaped, coloured, and extended in professional nail services. Understanding the free edge — its structure, its mechanical behaviour, why it breaks where it does, how shape affects strength, and how to seal and protect it in enhancement services — is foundational professional knowledge.
Quick Summary
The free edge is more structurally complex than it appears. It is not simply the nail that has grown past the fingertip — it is a cantilevered structure, producing mechanical stress at the junction between the supported and unsupported portions of the nail plate every time the hand is used. The stress zone, the c-curve, the shape of the free edge, and the length of the extension all interact to determine how robust or vulnerable the nail is in daily use.
The free edge is also where the most common causes of product failure originate — tip lifting from unsealed edges, breakage at the stress zone from over-length, and discolouration from contamination beneath an unsealed tip. Each of these has a specific structural explanation that informs both prevention and correction.
Contents
- Anatomy of the Free Edge
- The Free Edge as the Oldest Part of the Nail Plate
- When Damage Appears at the Free Edge — and Why It Gets Worse Before It Gets Better
- Structural Mechanics — Why the Free Edge Breaks Where It Does
- The C-Curve at the Free Edge
- Nail Shape — How It Affects Structure and Strength
- Shaping Technique
- The Free Edge in Professional Nail Services
- Why the Free Edge Is White
- Common Problems at the Free Edge
- Frequently Asked Questions
Anatomy of the Free Edge
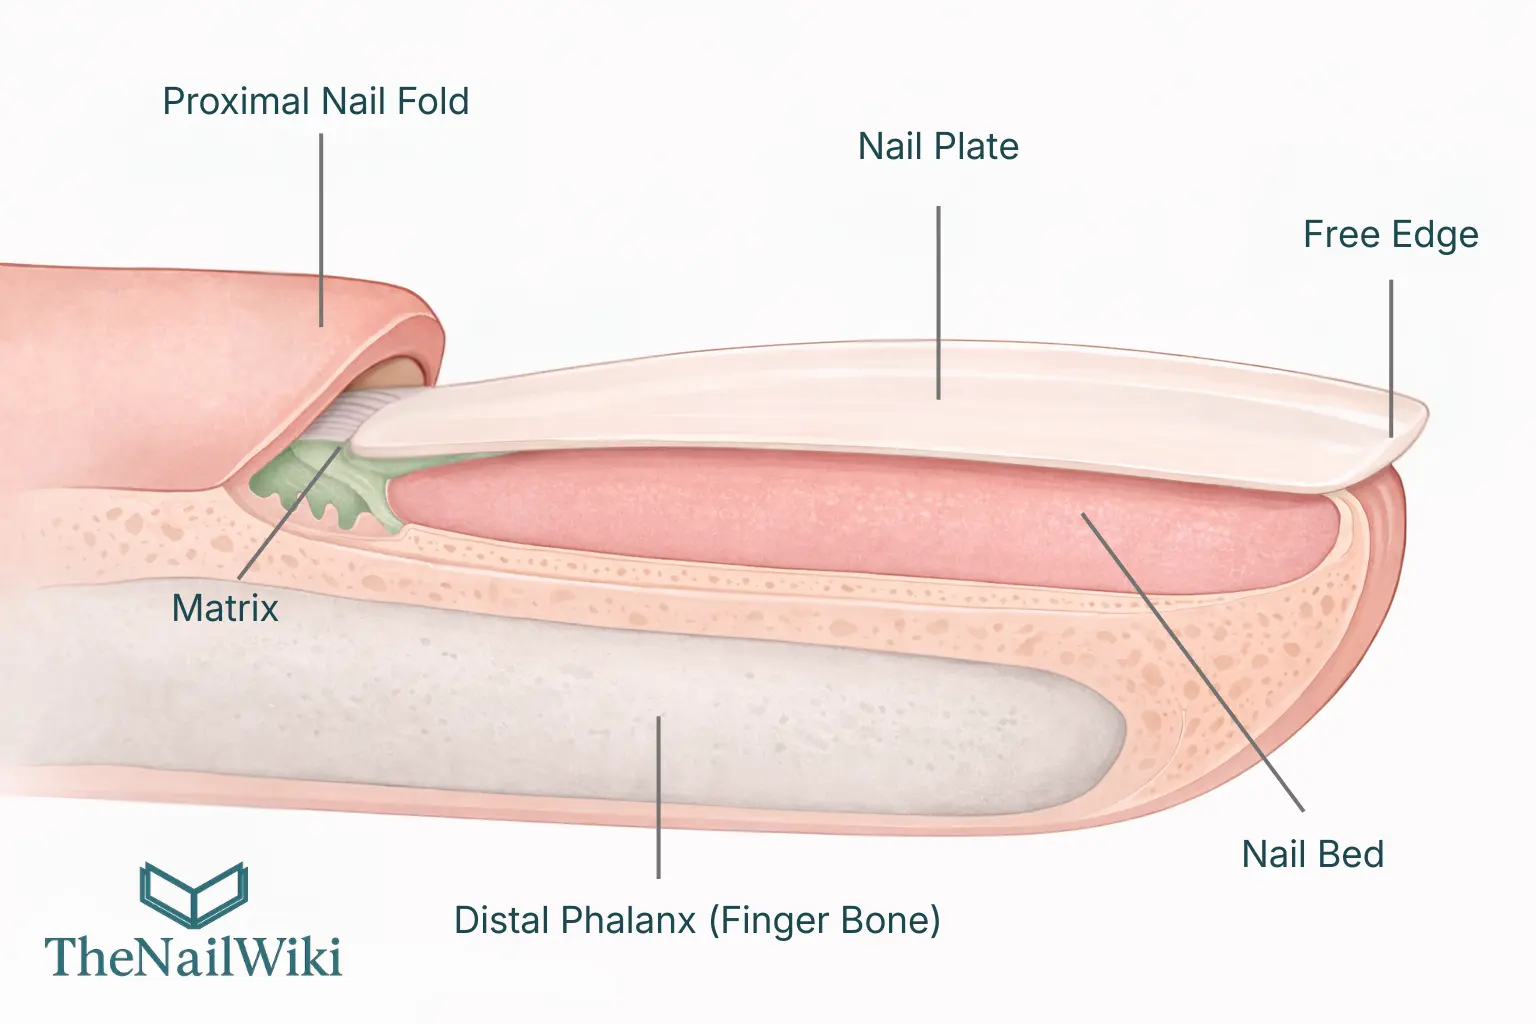
© TheNailWiki
The nail plate extends from the nail root — hidden beneath the proximal nail fold — forward across the nail bed to the fingertip, where it separates from the nail bed at the hyponychium and continues forward unsupported as the free edge. The onychodermal band — the last point of firm nail-bed adhesion — marks the proximal boundary of the free edge zone. Distal to the onychodermal band, the nail plate is fully free.
The free edge has no tissue beneath it — no nail bed, no blood supply, no structural support from below. It is held only by the continuity of the nail plate itself and the lateral constraints of the lateral nail grooves at its proximal corners. Beyond the grooves, the free edge projects into space — a cantilever extending from the last point of attachment.
The free edge is visible from above as the white or opaque distal portion of the nail. It is also visible from the side — where the nail plate thickness and c-curve are most clearly observable — and from beneath, where the underside of the free edge shows the natural colour and texture of the inner nail plate surface.
The Free Edge as the Oldest Part of the Nail Plate
The nail plate is produced continuously at the nail matrix and grows forward at approximately 3.0–3.5mm per month on a healthy adult fingernail. This means that what is currently at the free edge was produced in the matrix approximately six months ago. The free edge is therefore the oldest part of the nail plate — and the most fully keratinised.
Keratinisation is the process by which the onychocytes — the cells of the nail plate — progressively flatten, harden, and lose their internal structures as they travel from the matrix through the nail root and along the nail bed. By the time cells reach the free edge, this process is complete. The free edge is denser and harder than the nail plate at the proximal end, and it is also the driest — having been furthest from the nail bed’s moisture supply for the longest time.
This has practical implications for nail services. The free edge responds differently to filing than the more proximal nail plate — it is harder and requires appropriate grit selection. It also tends to be more brittle than the proximal nail, particularly in clients who have frequent water exposure, as the fully keratinised cells at the free edge have the least resilience when repeatedly hydrated and dehydrated. This is why splitting and peeling of the free edge is a common complaint in clients whose hands are frequently in water.
When Damage Appears at the Free Edge — and Why It Gets Worse Before It Gets Better
Because the nail plate grows from the matrix forward — taking approximately six months to travel from the proximal nail fold to the free edge — any damage done to the nail plate at the matrix or proximal zone does not become visible immediately. It grows forward slowly and emerges at the free edge months after the event that caused it.
This creates one of the most common misunderstandings between clients and nail professionals. A client who has experienced aggressive over-filing or a damaging service — at a non-standard nail salon, for example (see: Standard vs Non-Standard Nail Salons) — where the nail plate was thinned beyond safe limits, may not see the consequences of that damage immediately. When they change to a professional technician who works correctly, the damage from the previous salon is still in the plate, growing forward. As it reaches the free edge, the nail becomes thin, translucent, fragile, or begins peeling and lifting in ways it did not before.
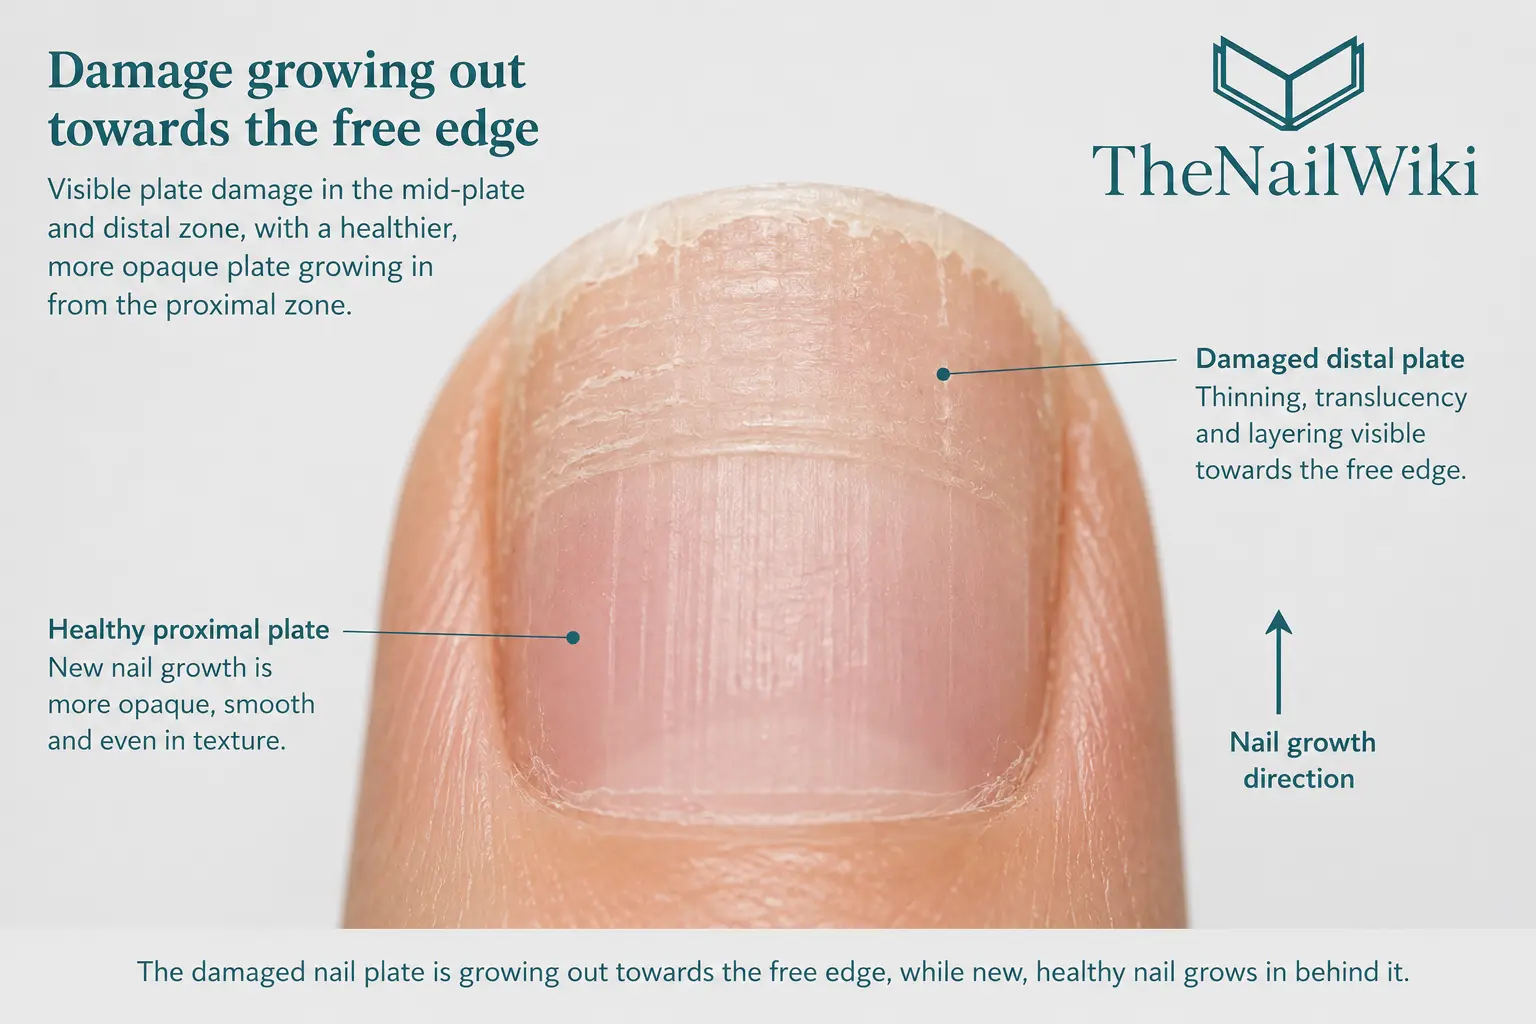
© TheNailWiki
The client may attribute this deterioration to the new technician — concluding that the previous salon was better because the nails looked fine, and the new one is causing damage because the nails are now visibly suffering. In reality, the opposite is true. The new technician is working correctly. The damage was already embedded in the plate from months earlier. The professional is seeing and dealing with the consequences of what was done before — and those consequences will continue to grow out until the damaged plate has fully reached the free edge and been filed or grown away. This can take up to six months from the point of damage.
What to tell a client when this happens
Explain clearly that the nail plate is a record of everything that has happened to it over the past six months. The damage visible at the free edge now was caused before they came to you. The healthier plate growing in behind it — which will not reach the free edge for months yet — is the plate being produced under correct professional care.
It is also worth explaining that this is exactly what happens when a client leaves a non-standard salon and moves to a professional — things appear to get worse before they get better, because the damage is only now becoming visible. This is one of the most powerful pieces of education a nail professional can offer, and it directly validates the client’s experience while explaining the reality of nail plate biology.
Structural Mechanics — Why the Free Edge Breaks Where It Does
Breakage of the nail plate almost always occurs at the same location — at or just proximal to the free edge, at the junction between the supported and unsupported portions of the plate. This location is the stress zone, and its position directly corresponds to where the free edge begins.
The reason breakage concentrates here is straightforward structural mechanics. The attached nail plate is supported from below by the nail bed and constrained laterally by the nail grooves — forces applied to it are distributed across that support. The free edge, by contrast, is a cantilever — a rigid arm projecting from a fixed point. When a downward force is applied to the tip of the free edge (pressing against a surface, opening a can, typing), that force generates a bending moment that is greatest at the root of the cantilever — which is exactly where the free edge meets the attached nail plate. This is the stress zone, and it is where the plate bends, fatigues, and eventually fractures.
The points of growth — the lateral corners of the nail root zone where the nail plate exits into the lateral grooves — are also structurally significant at the free edge. These lateral points are the outermost corners of the nail plate at the stress zone. Any shape that removes material from these corners — narrowing the plate at the sides — directly compromises the structural integrity at the most vulnerable zone of the nail. This is why nail shapes requiring significant side tapering must be approached with full awareness of the stress implications, particularly on shorter nails where the points of growth and the stress zone are very close together.
The length of the free edge directly determines the magnitude of the bending moment. A longer free edge creates a longer lever arm — the same force applied at the tip generates a much greater bending moment at the stress zone than the same force applied to a shorter free edge. This is why clients with very long nails experience more breakage than clients who keep their nails shorter, and why the relationship between free edge length and nail strength is not linear — doubling the length more than doubles the stress at the stress zone.
Why the apex matters structurally
In nail enhancement work, the apex — the highest point of the product structure across the nail — is not purely aesthetic. The apex redistributes the bending forces across the enhancement structure, reducing the concentration of stress at the stress zone. A correctly placed apex that peaks over the stress zone absorbs the bending force through the arch of the product rather than concentrating it at the junction between plate and free edge. An incorrectly placed apex — too far forward or too far back — fails to intercept the bending force at the right point, and breakage occurs at the stress zone regardless of how thick the product is elsewhere.
The C-Curve at the Free Edge
The transverse arch of the nail plate — the c-curve — is most visible at the free edge, where the nail plate is no longer constrained by the lateral nail folds and can be seen in cross-section. Looking at the free edge from the front — end on — reveals the natural curvature of the nail plate as a letter C, with the two ends of the C representing the lateral edges of the plate and the curve representing the transverse arch.
The depth of the c-curve at the free edge is an expression of the natural architecture of the nail — it reflects the curvature of the nail bed beneath the attached plate and the shape of the nail unit as a whole. It varies significantly between individuals and between digits on the same hand. It is also one of the parameters used to assess form fit in dual form and extension work — the c-curve of the form must match or be compatible with the c-curve of the natural nail at the free edge.
In enhancement services, the c-curve of the finished nail should flow smoothly from the attached plate through to the free edge without a visible break or flattening at the stress zone. A flat section at the stress zone — where the product transitions from the c-curve of the nail to the flat or different-curvature free edge shape — concentrates stress at that transition and is a structural weakness. The enhancement should maintain its arch continuously from the proximal zone through to the tip.
Nail Shape — How It Affects Structure and Strength
The shape of the free edge defines the overall nail shape — square, round, oval, almond, coffin, stiletto, edge, and their variations. These terms describe the profile of the free edge as viewed from above. Each shape has different structural implications depending on how it distributes or concentrates stress across the nail plate.
The critical principle is that any shaping of the free edge that removes material from the sides of the nail — tapering or narrowing the profile — reduces the lateral support of the plate at the stress zone. The wider the free edge at the point where it meets the attached nail plate, the more structurally robust the nail. This is why squoval and square remain the most structurally sound shapes across most client types and lengths.
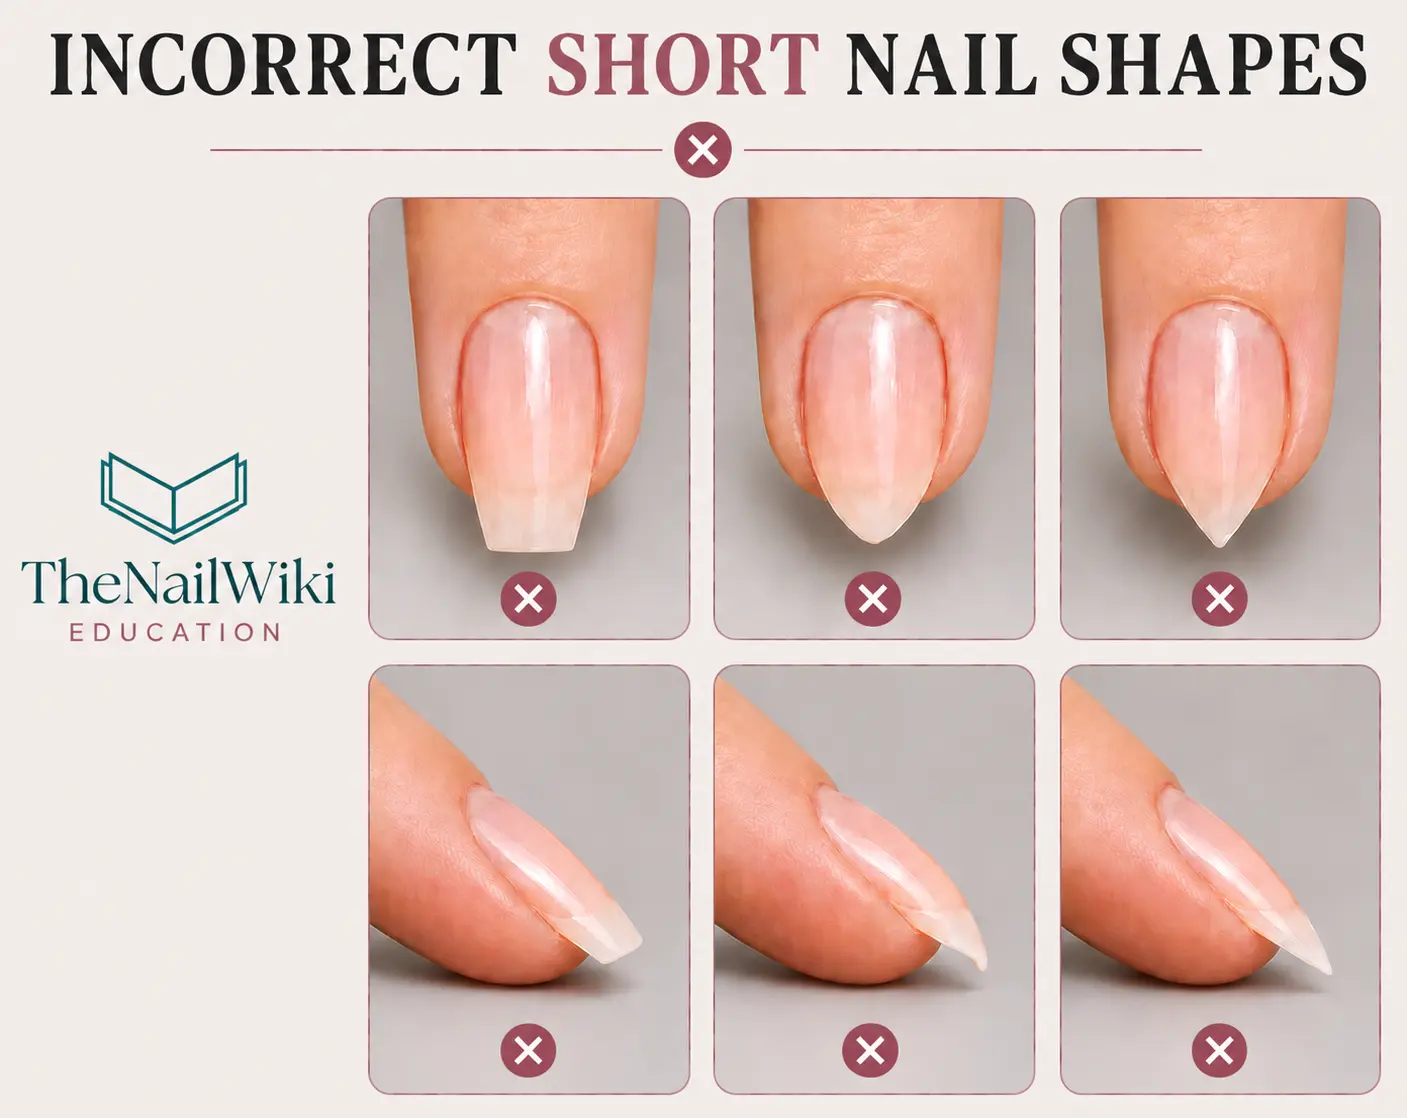
Damaging shapes on short nails — almond, stiletto, and tapered shapes with insufficient length
Almond, stiletto, and other significantly tapered shapes require a minimum free edge length to be structurally viable. The taper requires the sides of the nail plate to be removed — reducing the plate width towards the tip. On a nail with sufficient length, this tapering begins well forward of the stress zone, and the plate retains adequate width where it matters structurally. On a short nail, the tapering must begin at or near the stress zone itself — removing material directly from the points of growth and the lateral stress area.
This creates two serious problems. First, the structural weakness at the stress zone is dramatically increased — the nail breaks almost immediately under normal daily use. Second, to achieve the taper on a short nail, the file must be angled aggressively into the lateral corners — digging into the area of the points of growth and the lateral nail grooves. This aggressive corner filing, repeated over multiple services, progressively compromises the lateral integrity of the nail plate and can contribute to onycholysis at the sides as the stressed plate begins to separate from the nail bed at its lateral edges.
© TheNailWiki
Tapered shapes should only be created on nails with sufficient length to allow the taper to begin well beyond the stress zone — or on enhancement product, where the product structure can be built with the apex and strength zone accounting for the reduced lateral support. Attempting tapered shapes on short natural nails without enhancement product is one of the most consistent causes of accelerated breakage and lateral plate compromise seen in professional nail practice.
Shaping Technique
The free edge is shaped using a nail file — the grit appropriate to the material being shaped. Natural nail plate requires a finer grit than hard gel or acrylic enhancement product. The following technique principles apply regardless of shape being produced.
Filing direction
Filing at the sides of the free edge should be done in one direction — rather than sawing back and forth. Sawing motion creates micro-fractures through the nail plate layers at the free edge, which progressively propagate as the nail grows. These micro-fractures are the primary cause of the peeling and layering at the free edge that clients attribute to dry nails or product use — in many cases, the cause is filing technique.
Bevelling the underside
In manicure, gel polish, and regular polish services — where the natural free edge remains visible — the underside of the free edge should be lightly bevelled smooth using a fine file or buffer after shaping. This removes any sharp edge or rough surface that snags on fabric, skin, or hair. An unsmoothened underside significantly increases the chance of catching and forcible breakage in daily life. Bevelling does not apply in hard gel, BIAB, or extension services where the free edge is removed — see the section below on modern nail technology.
Avoiding corners in the grooves
At the lateral sides of the free edge — where the plate exits the lateral nail grooves — the file should not be angled into the groove to cut the corners of the nail back below the groove level. Cutting corners below the groove removes the lateral support of the plate at its sides and, in clients prone to ingrown nails, can initiate ingrown nail formation by allowing the plate edge to embed into the fold as it grows forward without a free edge to guide it through the groove.
The Free Edge in Professional Nail Services
Sealing the free edge
Sealing the free edge applies specifically to gel polish and regular polish services — where the free edge of the natural nail remains visible. In these services, a thin layer of product is applied across the very tip of the nail — the edge of the free edge — to close the gap between the top coat and the underside of the nail plate at the tip. Without this seal, moisture, hand wash solvents, and acetone can track beneath the product from the tip during daily use, softening the adhesive bond and causing the product to lift from the free edge upwards.
Sealing the free edge is not the same as flooding product beneath the plate. The seal is applied across the edge — the very tip — not pushed under the plate surface. Flooding product beneath the plate at the free edge risks contact with the hyponychium and is a sensitisation risk. Bevelling the underside of the free edge applies to manicure, gel polish, and regular polish services — see the shaping technique section above.
Free edge length assessment
The appropriate free edge length for a client depends on three factors: the structural quality of their natural nail plate, the enhancement product and structure being used, and their lifestyle and daily activities. A client with a thin, flexible natural nail plate will experience more breakage at a given free edge length than a client with a thick, robust plate. A correctly built enhancement with a sound apex structure allows a longer sustainable free edge than the same length in natural nail. A client who works with their hands, types heavily, or frequently puts hands in water has different length sustainability than a client with more sedentary daily activities.
Part of the professional consultation is advising on realistic and sustainable free edge length based on these three factors combined. Agreeing to a length that the natural nail cannot support, or that the client’s lifestyle makes impossible to maintain, results in repeated breakage — which damages both the nail and the professional relationship.
Modern nail technology — removing the free edge in hard gel, BIAB, and extension services
In modern professional nail technology — when working with hard gel, BIAB, dual forms, Sandwich Dual Forms, and nail extensions — the correct approach is to file off the natural free edge before applying product. This is not damage or shortening — it is a deliberate structural decision. The natural free edge is removed so that the enhancement product bonds fully to the nail plate surface without any unsealed edge between the product and the natural nail. There is no gap at the tip for moisture, solvents, or bacteria to enter. The product encases the nail completely.
Some clients resist this step — they want to see their own natural nail underneath the product and feel that removing the free edge means losing their natural nail. In reality, the nail is still entirely their own — the same plate, the same matrix, the same growth. No natural nail has been removed. What has changed is that the free edge of the natural plate is now within the enhancement structure rather than visible at the tip. The product continues from where the natural plate ends, creating a seamless, stronger, more architecturally sound result.
The structural benefit is significant. Without a visible natural free edge, the product structure can be built with a properly placed apex, a full c-curve, and a strong tip — all without the compromise of the product having to bridge across an unsealed natural edge. The result is a nail that is stronger, looks more refined, and lasts longer than the same product applied over a retained natural free edge. This is the direction professional nail technology has moved in, and it is the approach that produces the most durable, luxury-quality results.
In dual form and extension services
In dual form and Sandwich Dual Form services, the free edge shape is defined by the form — the shape of the form determines the profile of the finished free edge. After form removal, the free edge requires finishing: the underside is bevelled, the sides are refined, and the tip profile is checked for evenness. The form creates the basic shape but the finished quality of the free edge requires hand work after removal.
In sculpted extensions — where no form is used and the free edge is built by the technician freehand — the length, shape, and profile of the free edge are entirely the result of the sculpting and filing process. The technician must simultaneously build the free edge shape and ensure the structural integrity of the apex and stress zone are maintained throughout the shaping.
Why the Free Edge Is White
The attached nail plate appears pink because it is translucent and transmits the colour of the blood-rich nail bed beneath it. The free edge has no nail bed beneath it — there is no vascular tissue to transmit colour through the overlying plate. The nail plate itself, without the nail bed visible beneath it, is not fully transparent — it is a whitish, translucent material that appears white when there is nothing to show through it.
The boundary between the pink attached plate and the white free edge is not always a sharp line. The onychodermal band — just proximal to the free edge — creates a slightly different visual zone as the nail bed adhesion reduces and the plate begins to separate, producing a transitional band that is neither fully pink nor fully white. The prominence and visibility of this band varies between individuals.
The lunula — at the opposite, proximal end of the nail plate — also appears white but for different reasons. The lunula is white because the cells in that zone are not yet fully keratinised. The free edge is white because there is no nail bed beneath it. Two white zones at opposite ends of the nail, produced by entirely different mechanisms.
Common Problems at the Free Edge
Peeling and layering — onychoschizia
The nail plate at the free edge can separate into layers — a condition called onychoschizia. The most common causes are repeated wet-dry cycles, harsh chemical exposure (cleaning products, solvents, acetone-based removers), nutritional deficiency (particularly protein, iron, and biotin), and micro-fractures created by back-and-forth filing. The free edge layers apart because the bonds between the nail plate layers fatigue under repeated stress. Filing in one direction, cuticle oil hydration, and protective base coat application all reduce the rate of onychoschizia at the free edge.
Breakage at the stress zone
As described above, breakage concentrates at the stress zone — the junction between the supported and unsupported nail plate. Over-length, thin plates, incorrect apex placement, and high-impact lifestyle all increase breakage at this location. The solution depends on the cause: shortening the free edge, adding structured enhancement product, correcting the apex, or adjusting client expectations around length sustainability.
Tip lifting in gel services
Lifting that begins at the free edge tip — rather than at the cuticle — is almost always caused by one or more of the following: the free edge was not sealed, the seal cracked or was incomplete, the client soaks the tips in water regularly without protection, or the client’s lifestyle involves frequent acetone or solvent exposure at the fingertips. Sealing the free edge correctly at every service and advising on aftercare prevents this.
When working with hard products — BIAB, hard gel, dual forms, Sandwich Dual Forms, or extensions — tip lifting from this area is eliminated entirely by filing off the natural free edge before product application. With no free edge to lift from, the product bonds completely across the nail with no unsealed edge at the tip. This is one of the strongest structural arguments for removing the free edge in hard product services.
Discolouration at the free edge
Yellowing can result from staining — nail polish pigment migrating into the nail plate (more common with dark pigments applied without a base coat), nicotine, or prolonged contact with certain food colourants. White chalky patches or matt areas on the free edge after gel polish removal are keratin granulations — surface damage caused by the mechanical removal of gel polish. Greenish or brownish discolouration extending from the tip proximally indicates contamination of the subungual space — assess for green nail syndrome or fungal infection before proceeding with any service.
Keratin granulations
A chalky, white, matte texture on the nail plate surface after gel polish removal — most pronounced at the free edge — indicates keratin granulations. These are areas where the surface layers of the nail plate have been disrupted during removal, leaving an uneven, rough surface. They are not permanent damage — they grow out — but they indicate that removal technique caused mechanical stress at the plate surface. Correct soak-off technique, adequate soaking time, and avoiding forcing product off the plate prevent keratin granulations.
Frequently Asked Questions
What is the free edge of the nail?
The free edge is the portion of the nail plate that extends beyond the fingertip — past the nail bed and hyponychium — with no underlying tissue beneath it. It is the oldest, most fully keratinised part of the nail plate and is where nail shape is defined and enhancement length is created.
Why does the nail always break in the same place?
Nails break at the stress zone — the junction between the supported nail plate and the free edge — because this is where bending forces concentrate when the nail is used. The free edge acts as a cantilever, and the greatest mechanical stress is always at its base. This is normal structural behaviour, not a sign of damage or weakness in the product or preparation.
Why should the free edge be sealed in gel services?
Sealing the free edge closes the gap between the product and the underside of the nail plate at the tip, preventing moisture and solvents from tracking beneath the product during daily use. Unsealed free edges are one of the most common causes of tip lifting.
Does nail shape affect how strong the nail is?
Yes — significantly. Shapes that maintain width at the free edge (square, squoval) distribute stress across the full width of the nail and are the most structurally robust. Shapes that narrow the sides (almond, coffin, stiletto) concentrate stress at the narrowed lateral zones and are more prone to side cracking and breakage. The more extreme the tapering, the greater the structural compromise.
Why is the free edge white when the rest of the nail is pink?
The pink colour of the attached nail plate comes from the blood-rich nail bed showing through the translucent plate. The free edge has no nail bed beneath it, so there is no colour to transmit — the nail plate itself appears white. This is normal anatomy, not bleaching or damage.
What causes peeling at the free edge?
Peeling at the free edge is caused by separation of the nail plate layers — onychoschizia. The most common causes are repeated wet-dry cycles, chemical exposure, nutritional deficiency, and micro-fractures from sawing with a nail file. Filing in one direction, cuticle oil application, and a protective base coat all help reduce free edge peeling.
Professional training in nail shaping and enhancement
Nail shaping, free edge sealing, apex placement, extension length assessment, and structural enhancement technique are all taught as part of structured professional courses at Artistic Touch Nail Training Academy.
Related Library Pages
Nail Anatomy
- → Nail Plate
- → Nail Bed
- → Hyponychium
- → Onychodermal Band
- → Nail Matrix
- → Lateral Nail Grooves
- → C-Curve (Transverse Arch)
- → Lunula
Enhancement
Conditions
Some linked pages are currently in development and will be published progressively.
Professional Disclaimer
The information on this page is provided for educational purposes and is intended to support the professional knowledge of nail technicians, nail educators, and clients. It does not constitute medical advice.
About the Author
Radina Ignatova
Professional Nail Expert | International Nail Educator
Radina Ignatova is a Professional Nail Expert since 2014, International Nail Educator, and Founder of TheNailWiki and Artistic Touch Nail Training Academy. She specialises in Russian Manicure, dual form systems, polygel, advanced e-file techniques, and nail safety protocols, and continues to work actively in salon practice ensuring that all education reflects real client scenarios and current industry standards.
Her teaching philosophy is built on honest education — showing real salon challenges, real mistakes, and real performance testing rather than presenting only perfect demonstrations. This is how genuine technical competence is developed and how nail professionals become truly confident and capable.
Read full bio →© 2026 TheNailWiki — an independent nail education resource. Content is safety-led and professionally informed.